Indications
- Refusal to weight bear
- Limp
- Painful joint
- Swollen joint
Equipment
- Ultrasound machine
- Linear array probe (the curvilinear may be required for deep joins such as the hip in larger patients)
- Ultrasound gel

Indications
Equipment
Normal skin and soft tissue have many layers (Figure 1). The most superficial structures are the epidermis and dermis, which appear as if one hyperechoic structure. Deep to this, you will find subcutaneous fat, which is hypoechoic and globular. Blood vessels, nerves and lymph nodes are found within the hypodermis, and are varying in their echogenicity. Deep to these structures, the muscle is found beneath a hyperechoic layer of fascia. Muscle is seen as highly organized hypoechoic and striated fibers.
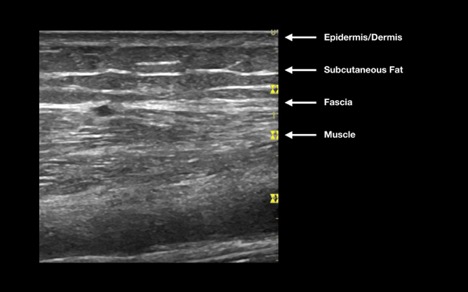 Figure 1: Anatomy of normal skin
Tendons are visualized as hypoechoic fibrillar organized structures, whereas fat pads are also hypoechoic, but are more homogenous in their appearance (Figure 2). Finally, smooth hyperechoic bone cortex may be seen as the deepest layer.
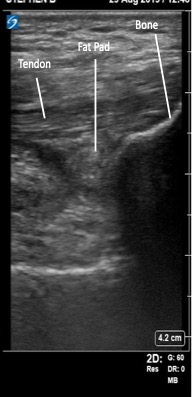 Figure 2: Anatomy of a normal joint
Children’s joints contain the same basic components as adult joints, but their appearance differs because the epiphyses in children are partially or completely composed of hyaline cartilage and growth plates remain open until the end of puberty [9].
In young children, the cartilaginous epiphysis is thick, and secondary ossification centres are small, giving the epiphysis a predominantly anechoic-to-hypoechoic appearance [9,10]. These secondary ossification centers gradually enlarge through adolescence, creating mixed echogenicity before the epiphysis becomes fully ossified in adulthood [9]. Because of the hypoechoic appearance and the increased cartilage thickness in early childhood, the expected depth to the joint capsule and can mimic or obscure joint effusions if not recognized [10]. The cartilaginous epiphysis may also have visible blood vessels on color doppler in young children [9].
Growth plates, which appear as hypoechoic ‘breaks’ or notches between the metaphysis and epiphysis, may also show irregularities in older children that should not be mistaken for the joint space [10].
Key point: Age-dependent differences in cartilage thickness, ossification patterns, and growth plate appearance are normal features of pediatric MSK ultrasound. Recognizing these features helps prevent normal cartilage or physeal anatomy from being misinterpreted as joint fluid or other pathology.
 Figure 3ab. A) Normal pediatric (2 yrs) non-ossified knee VS (B) normal adult knee
Video 1. Normal pediatric knee ultrasound in a 4-year-old demonstrating hypoechoic cartilaginous portions of the distal femoral epiphysis and patella, with an echogenic patellar ossification center and adjacent hypoechoic developing ossification.
In order to facilitate comparing an affected joint with the contralateral side, it can be useful to use the dual screen function on the ultrasound machine.
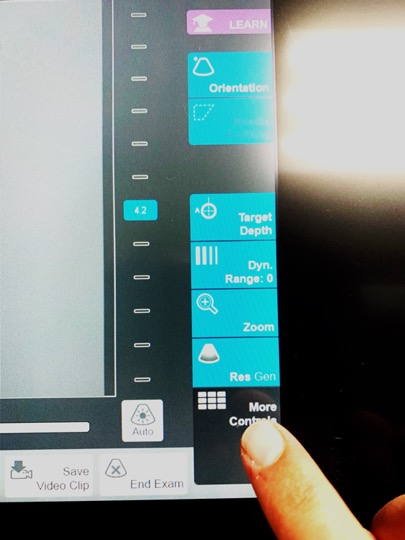 Figure 4a: Choose “more controls”
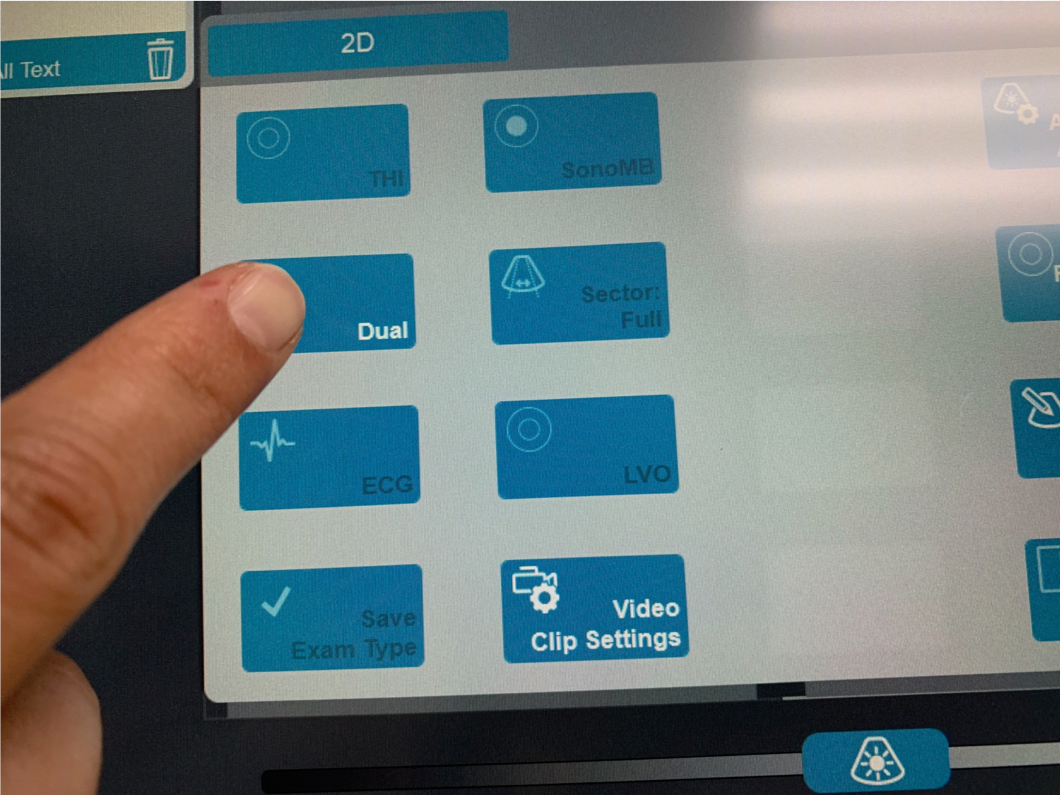 Figure 4b: Choose “dual”
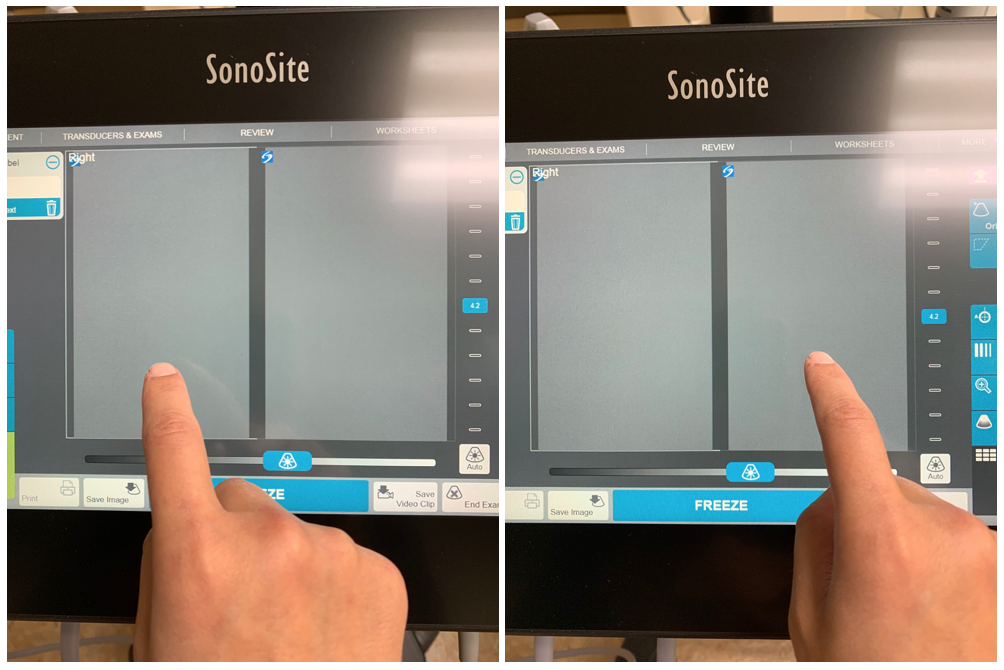 Figure 4c: Toggle between screens by touching the desired side
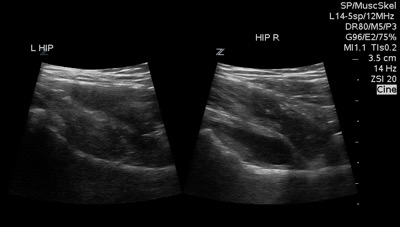 Figure 4d: Dual screen example
The hip joint is a ball and socket joint, comprised of the femoral head and neck and the acetabulum (made up of the ischium, pubis and ilium). The joint capsule surrounds these structures and contains synovial fluid (Figure 5).
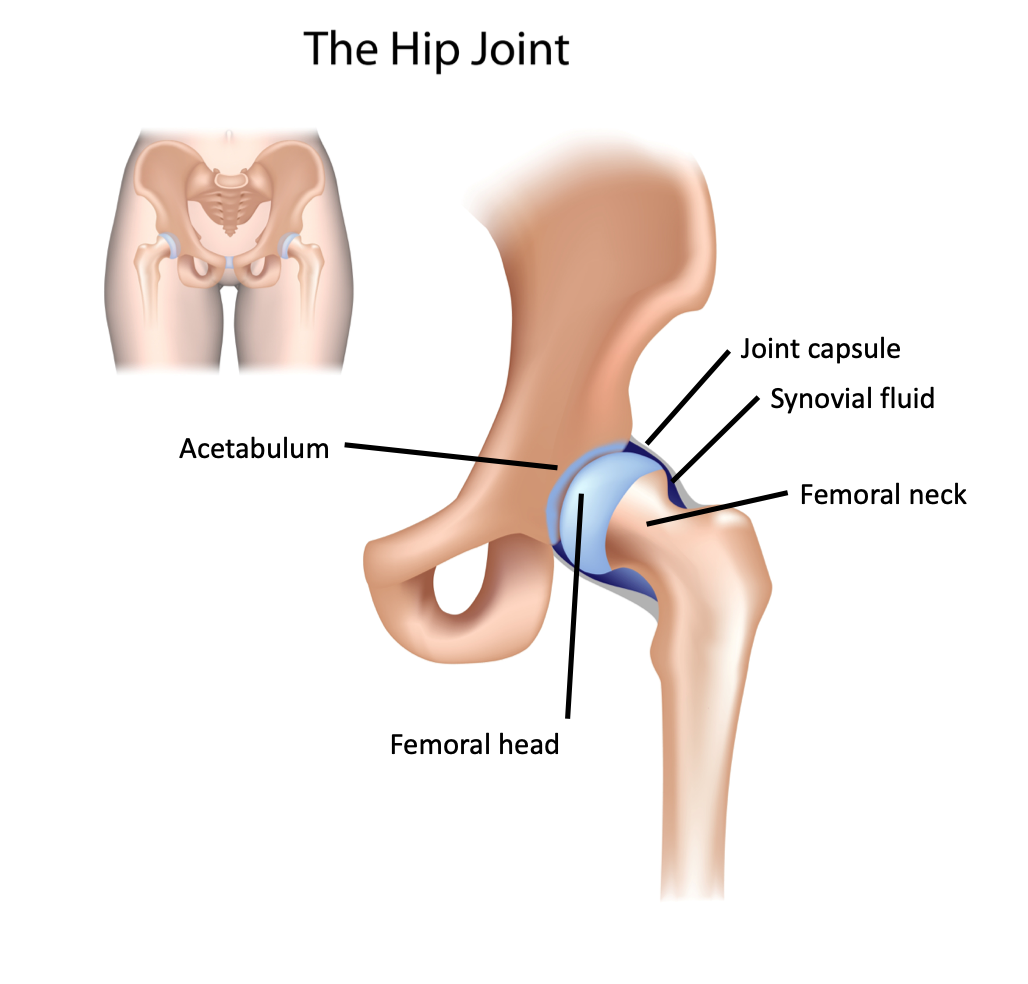 Figure 5: Anatomy of the hip joint
Superficial to the bony structures, we find the musculature of the pelvis and the hip. Those that are relevant to us for the purpose of scanning for hip effusions include the iliopsoas, quadriceps and sartorius. These muscles are found superficial to the joint (Figure 6).
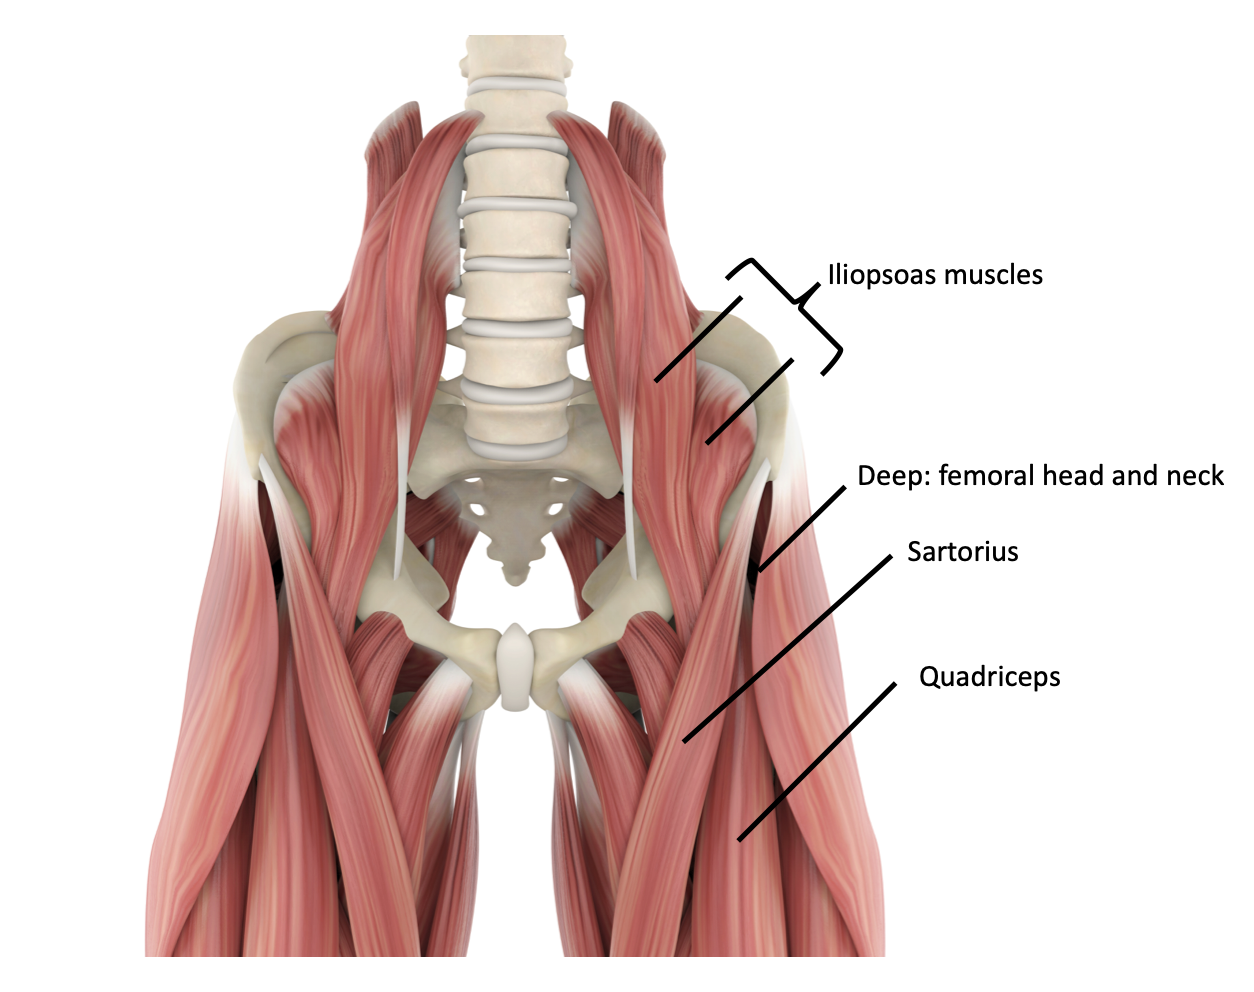 Figure 6: Hip musculature
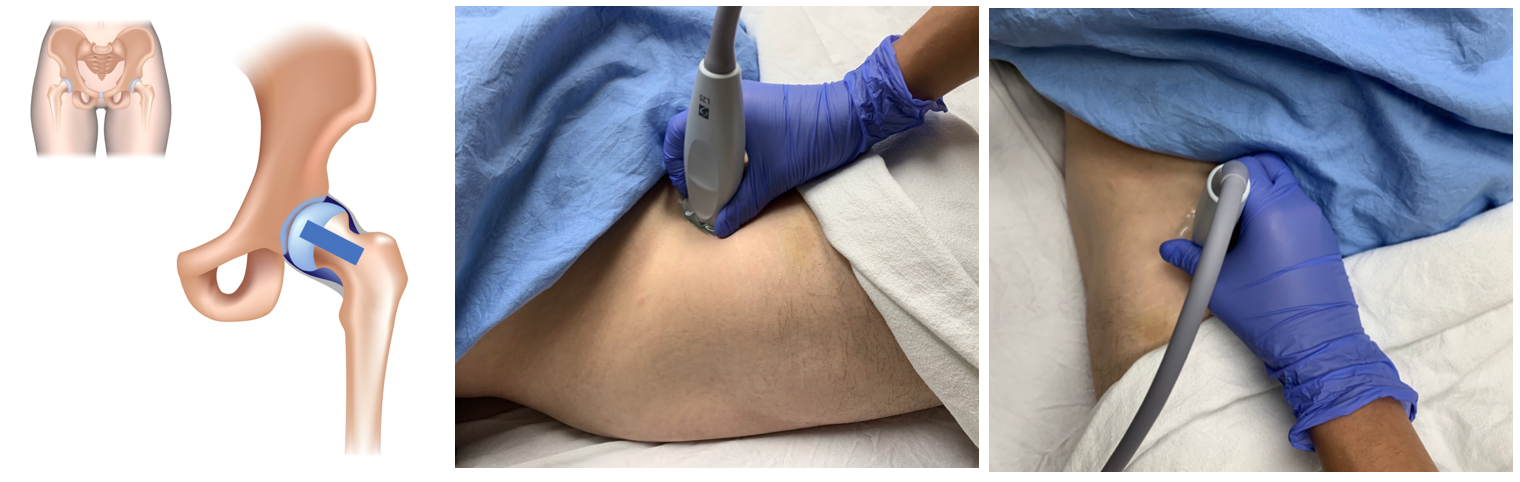
Figure 7: Probe position for hip ultrasound
Femoral neck
Femoral head
Muscles
Synovial space
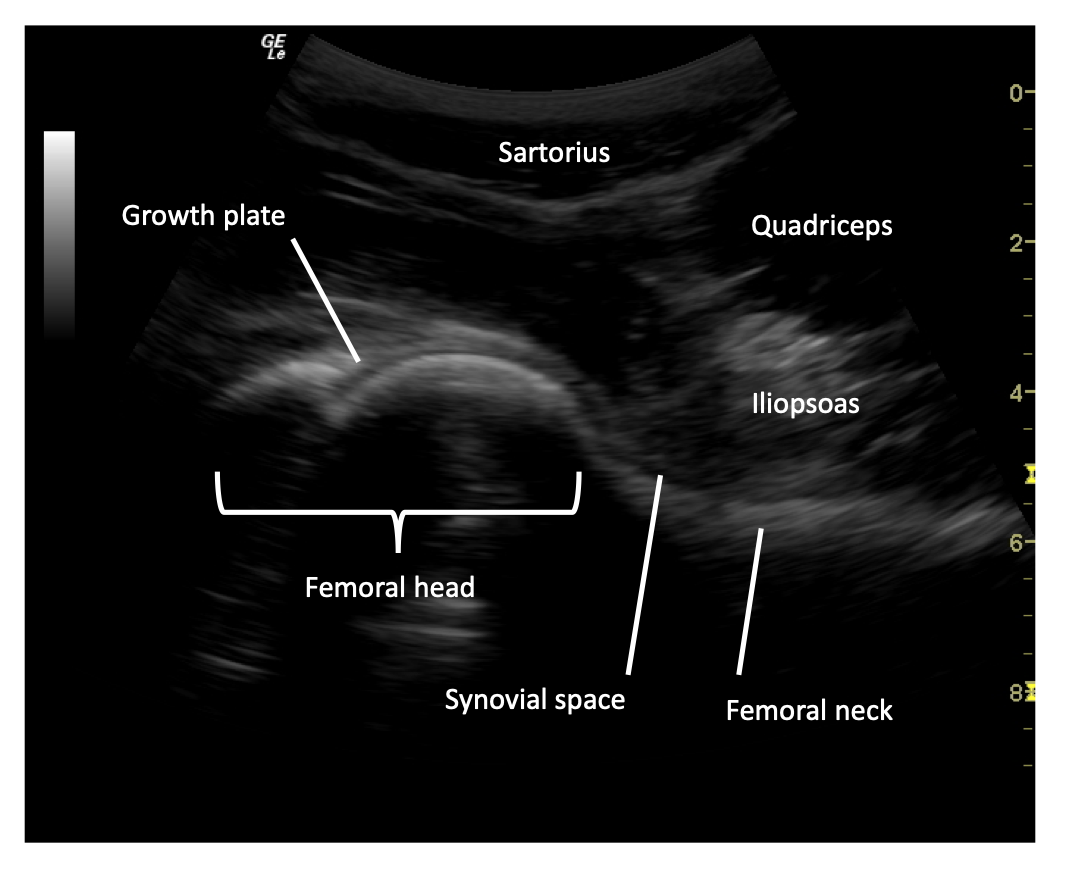 Figure 8: Labelled normal hip ultrasound.
Normally, synovial fluid will follow the contours of the joint itself, in this case, the femoral head and neck. The size of a fluid collection in the hip is measured from the anterior surface of the femoral neck to the posterior surface of the iliopsoas muscle [4]. The space should be <5mm and within 2mm in comparison to the unaffected hip (Figure 9).
 Figure 9: Normal adult hip ultrasound.
 Figure 10. Normal pediatric hip ultrasound appearances in children aged 2 and 4 years, demonstrating age-related differences in the amount and appearance of cartilage and ossification. The examples illustrate the progressive ossification of the developing hip, with relatively greater hypoechoic cartilage in the younger child and increasing echogenic ossification with age.
The presence of a joint effusion in a hip is defined as a space between the anterior surface of the femoral neck to the posterior surface of the iliopsoas muscle of >5mm or >2mm difference in comparison to the unaffected side (Figure 11). An effusion will classically have a convex appearance (Video 2) in comparison to the normal concave appearance of the synovial fluid in a joint without an effusion.
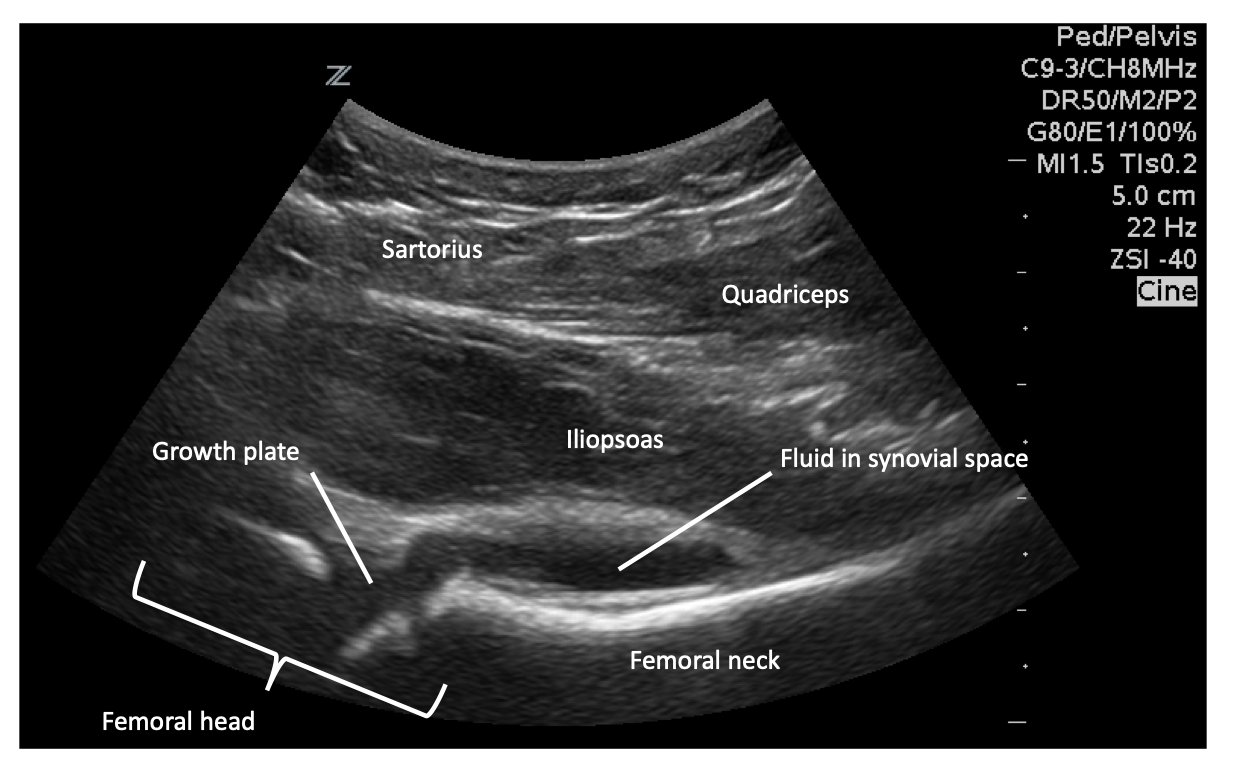 Figure 11: Positive hip effusion.
Video 1: Hip joint effusion. Note the convex appearance of the fluid on the image on the right.
The knee is made up of the articulating surfaces of the femur and the tibia, with the patella lying anteriorly. The quadriceps tendon inserts on the patella, and the patellar tendon extends distally to the tibial tuberosity. The fluid within the synovial capsule is continuous with the suprapatellar bursa. The fat pads found within the knee joint include the quadriceps fat pad and the pre-femoral fat pad (Figure 12).
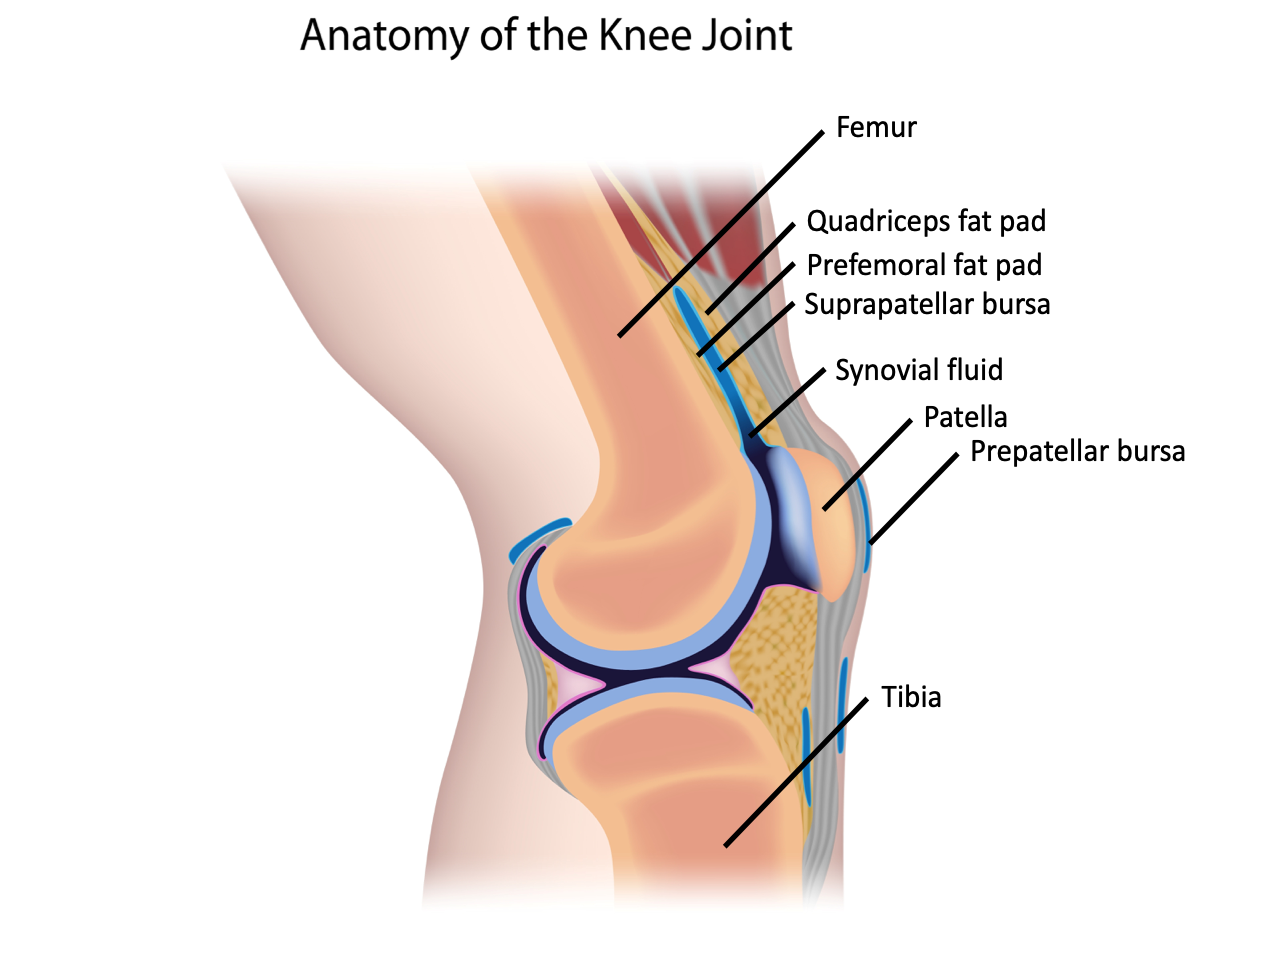 Figure 12: Anatomy of the knee joint.
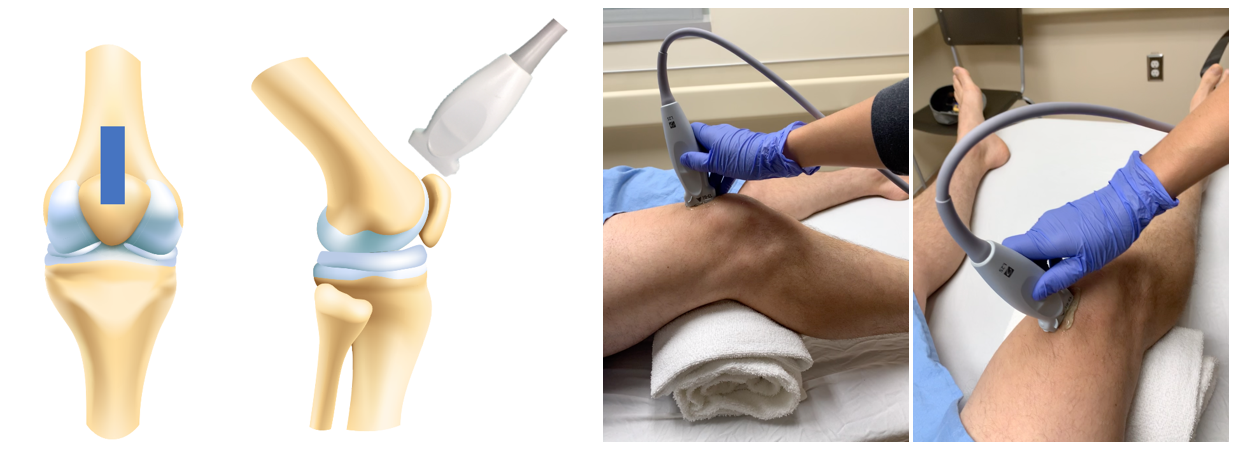 Figure 13: Probe position for knee ultrasound
Patella
Femur
Quadriceps tendon
Fat Pads
Suprapatellar bursa
Prepatellar bursa
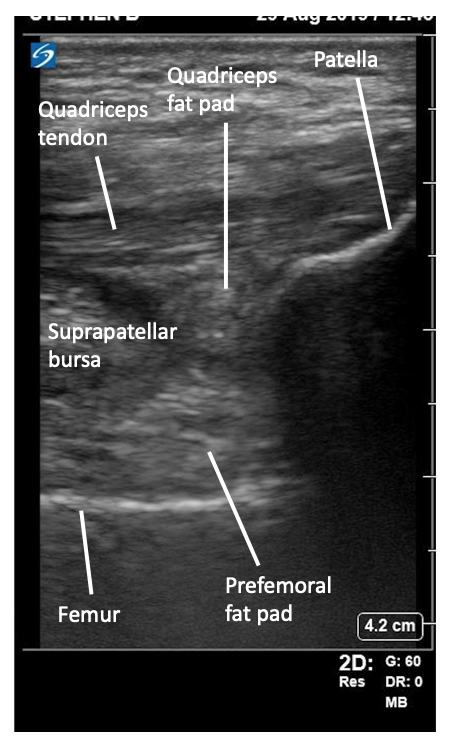 Figure 14: Labelled normal knee ultrasound.
Visualization of the knee joint in this view will show you the patella caudally and the femur extended cranially (Video 3). The quadriceps tendon will be a fibrous structure running in the near field (Figure 15). The suprapatellar bursa should be less than 2mm thick [1].
Video 3: Normal knee ultrasound.
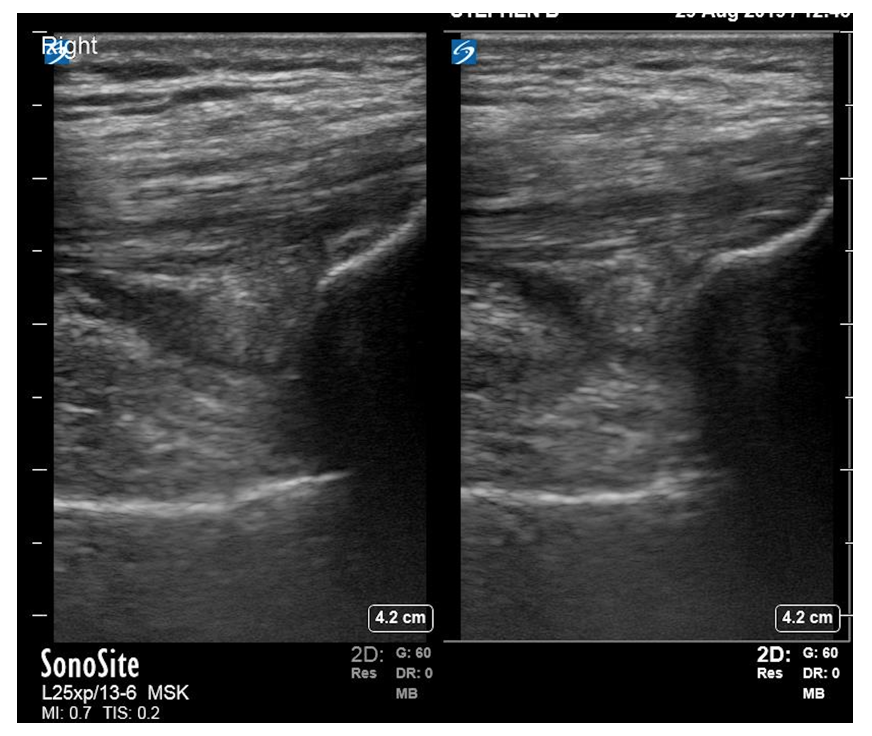
Figure 15: Normal right and left knee ultrasound.
 Figure 16. Normal pediatric knee ultrasound appearances in children aged 2, 4, and 8 years, demonstrating age-related changes in the amount and appearance of cartilage and ossification. The examples illustrate the progressive ossification of the developing skeleton, with relatively greater hypoechoic cartilage in younger children and increasing echogenic ossification with age.
Fluid will collect in the suprapatellar bursa, found in between the prefemoral and quadriceps fat pads (Video 4). The ultrasound is positive for a knee effusion by a collection of hypoechoic fluid which is >2mm thick [1] (Figure 17). If you are not seeing any fluid collection, flexion of the knee can increase the fluid in the suprapatellar recess [15]. In addition, fluid can collect on both the medial and lateral side of the suprapatellar region, therefore scanning these areas can help identify fluid collections. To do this, slide the probe laterally and medially within the sagittal plane to identify hypoechoic fluid collections. This can help with performing ultrasound guided arthroscopy of the knee, although that is outside the scope of this module.
Video 4: Knee joint effusion. Note the fluid collection between the quadriceps fat pad and quadriceps tendon superiorly and the prefemoral fat pad inferiorly.
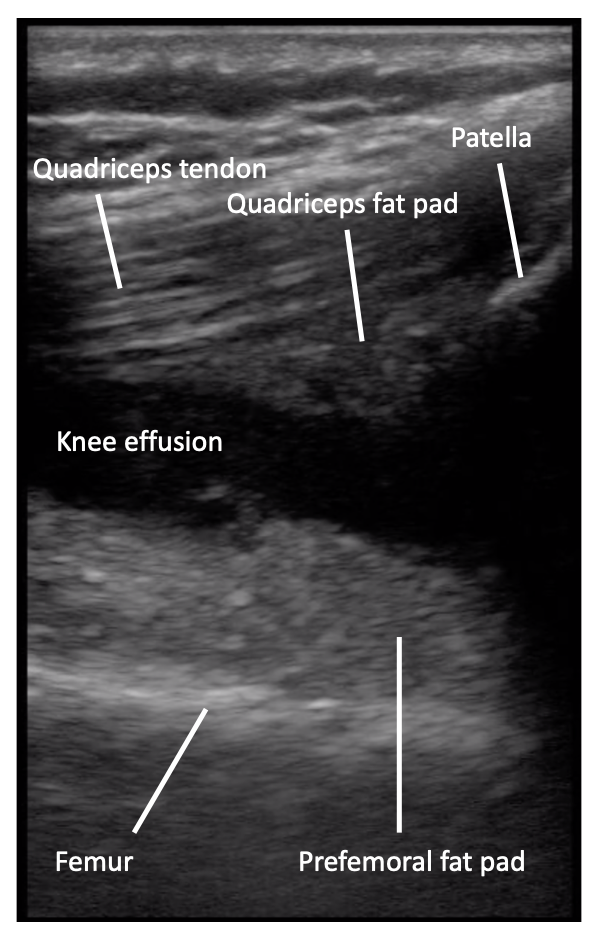 Figure 17: Positive knee effusion.
The area where an effusion in the ankle collects is at the intersection of the tibia and the talus (Figure 18). There is a fat pad (the anterior fat pad) at the junction of these two bones. Superficial to the boney surfaces, the tibialis anterior tendon is found.
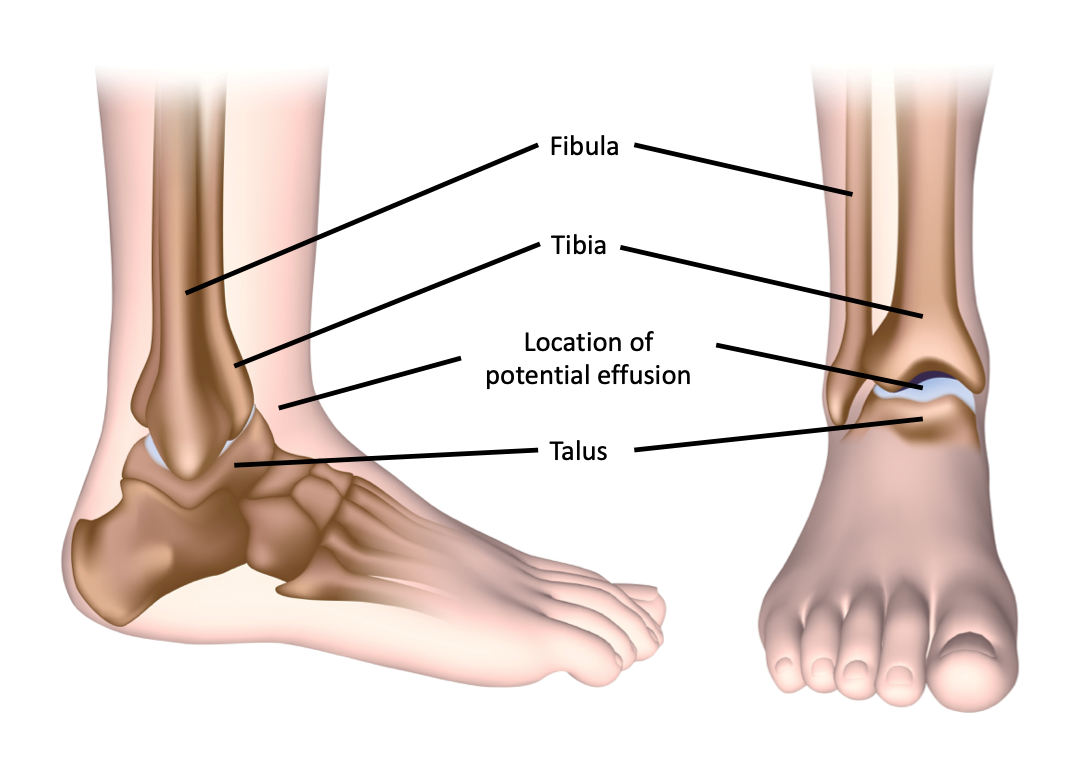 Figure 18: Anatomy of the ankle joint.
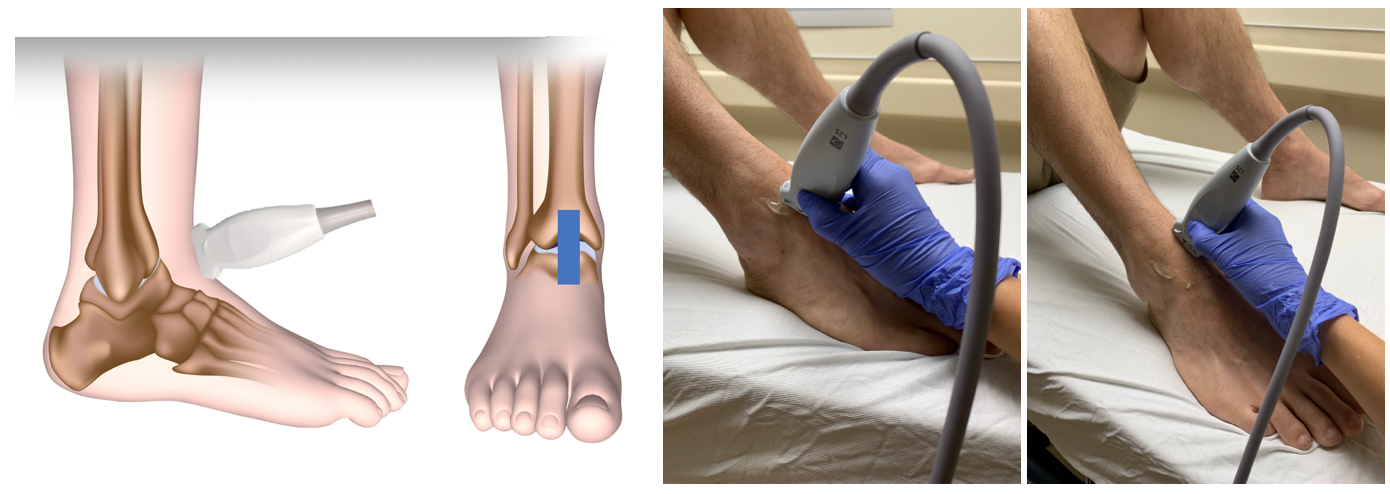 Figure 19: Probe position for ankle ultrasound.
Tibia
Talus
Tibialis anterior tendon
Anterior fat pad
Anterior talotibial recess or synovial space
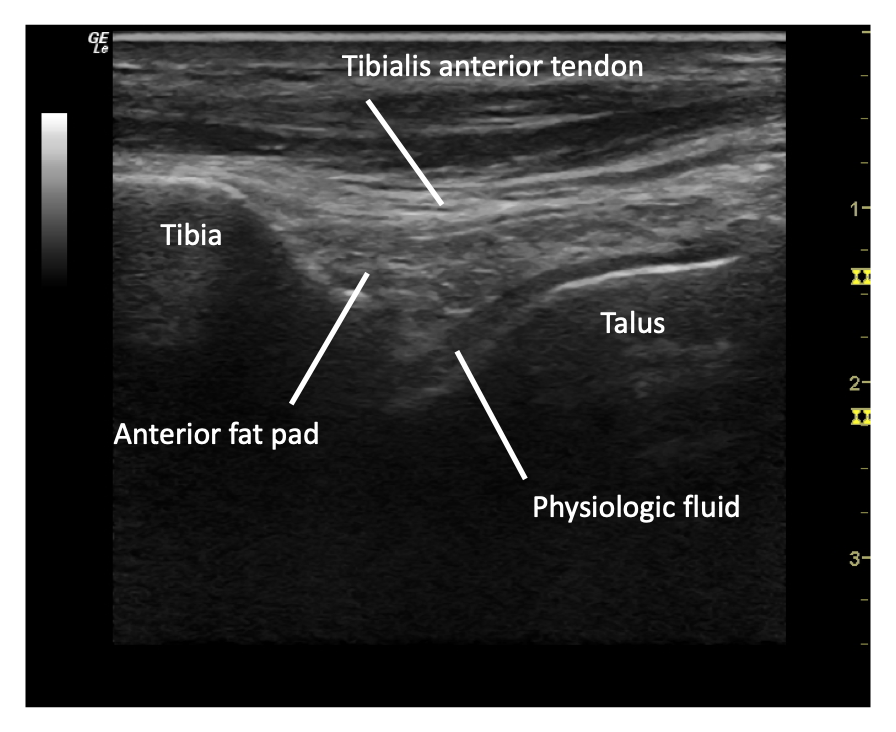 Figure 20: Labelled normal ankle ultrasound. Note that physiologic fluid and cartilage can appear similarly, so differentiate them with compression of the structures. Fluid will compress, cartilage will not.
On ultrasound of the ankle, you will see the tibia extending cephalad and the joint line between the tibia and the talus (Video 5). Within the joint space, near field to the bony structures, there may be a small amount of physiologic fluid, and an anterior fat pad. As in the other joints, physiologic fluid will follow the contours of the bone, and have a more concave appearance (Figure 21).
Video 4: Normal ankle ultrasound.
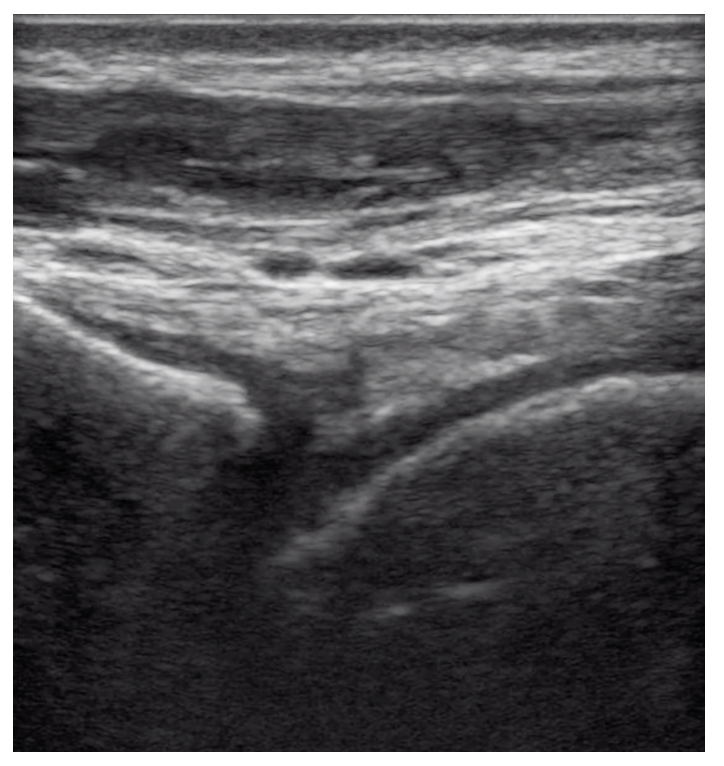 Figure 21: Normal ankle ultrasound.
 Figure 22. Normal pediatric ankle ultrasound appearances in children aged 2, 4, and 8 years, demonstrating age-related changes in the amount and appearance of cartilage and ossification. The examples illustrate the progressive ossification of the developing skeleton, with relatively greater hypoechoic cartilage in younger children and increasing echogenic ossification with age
An ankle effusion is characterized by a convex shaped hypoechoic fluid collection anterior to the tibial and talar joint (Figure 23). In the ankle, unlike in the hip, there is no specific measurement for a positive effusion – the important feature to look for is the convexity of the collection (Video 6).
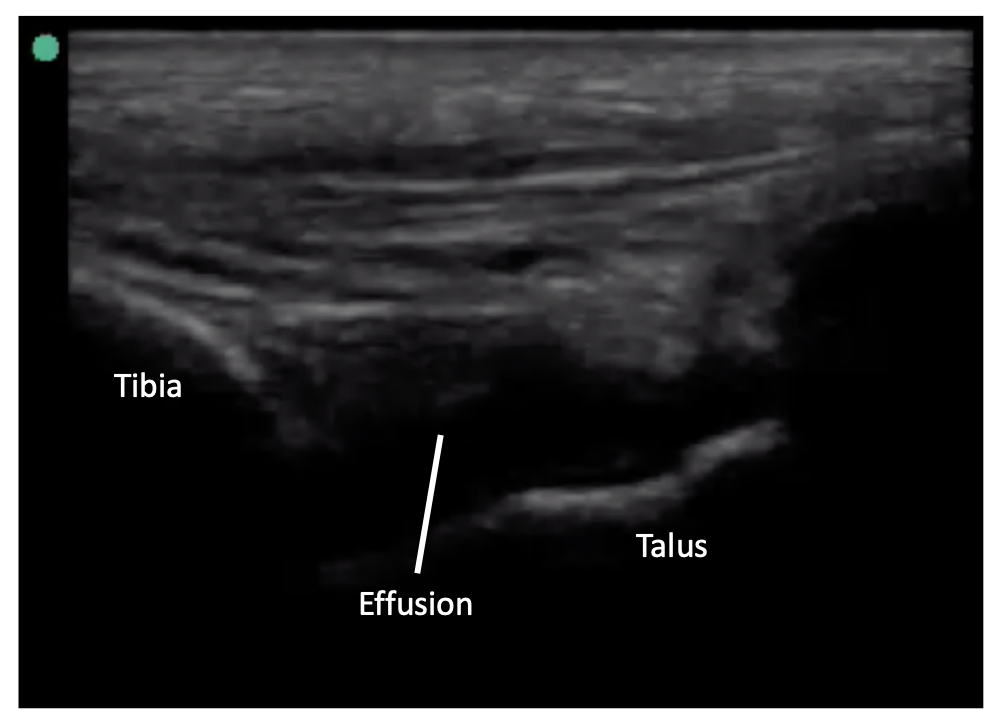 Figure 23: Positive ankle effusion.
Video 6: Ankle joint effusion. Again, note the convex appearance of the fluid.
In all joints, it is important to assess both the affected joint, and the contralateral side, as a small amount of fluid within the spaces can be normal. In addition, cartilage can appear hypoechoic within these spaces, but will be non-compressible [1]. Fluid within an effusion can be simple (anechoic) or complex (heterogenous in echogenicity) depending on what caused the effusion. Examples of potential complex effusions include hemarthrosis with clots or loculated septic arthritis [1, 3]. Synovitis can mimic a complex effusion, but can be differentiated with the addition of color to look for low grade venous flow. Finally, in pediatric patients, age-specific differences in cartilage thickness and growth plate appearance can be mistaken for joint fluid or other pathology. It is therefore important to keep the expected appearance at different stages of skeletal development in mind when interpreting findings.

Author: Dr. Robin Buna
Secondary Author: Dr. Melanie Willimann
Reviewer(s): Dr. Mark Bromley
*To continue through to the course, make sure to select the “Mark as Completed” button below.
By selecting the “Mark as Complete” button below, I acknowledge that:
Cellulitis can have a highly variable appearance. In general, the subcutaneous tissue appears thickened and will have a “cobblestone” appearance. This is caused by subcutaneous edema and inflammation generated by the surrounding infection. Cobblestoning is not a specific finding to cellulitis but a finding in tissue edema, care must be taken to correlate to the clinical scenario. If uncertain, compare the area of interest to an unaffected area of skin.
Figure 3: Cobblestoning
| Cobblestone appearance of cellulitis | Cobblestone sidewalk |
 |
 |
Video 4: Soft tissue cobblestoning
Edema from any source including:
Abscesses appear as heterogeneous anechoic, isoechoic (gray) or hypoechoic fluid collections. Their appearance is often not uniform. Abscesses can be well-circumscribed or be irregularly shaped areas of fluid which may demonstrate posterior acoustic enhancement (bright white in the far field). As with cellulitis, measure the size of the abscess in both the transverse and longitudinal plane. There is some evidence from an immunocompetent pediatric emergency department population that abscesses larger than 5 cm in diameter predict need for hospitalization [14]. In addition, measure the depth from the skin and the width from the base in order to guide future attempts at incision and drainage. As part of the evaluation, apply firm and graded pressure with the probe over the abscess to look for fluctuance (often over a point of maximal tenderness) and the “swirl sign.” Swirl sign refers to the movement of fluid and debris within the abscess and is generated by compression over the area. Finally, always evaluate the abscess with color Doppler to look for internal blood flow and surrounding vasculature prior to making an incision.
Video set 5: Examples of soft tissue abscesses
Courtesy of EDSONOshare library
Video 6: Video illustrating a positive “Swirl Sign”
| Practice Pearl: Prior to performing any incision and drainage of an abscess, use color Doppler to look for evidence of blood flow. In addition, color Doppler can be used to identify surrounding blood vessels in order to decrease the rate of procedural complications. |
Figure 4: Color Doppler over a suspected abscess

This mass was a clinically suspected abscess but bedside PoCUS identified significant blood flow. Planned incision was aborted and the patient was referred to surgery for further management.
Due to the low incidence and high morbidity of necrotizing soft-tissue infections, it remains a diagnosis that requires physicians to maintain a high clinical index of suspicion. The use of bedside ultrasound should never delay surgical consultation for these patients but should instead be used to expedite diagnosis. There are three main sonographic findings in necrotizing fasciitis. These include subcutaneous air (often tracking along a fascial plane) with accompanying “comet-tail” artifact, diffuse subcutaneous tissue thickening (which often requires comparison to a contralateral side), and >5mm of fluid accumulation along a facial plane [10].
Figure 5: Sonographic findings suggestive of necrotizing infection
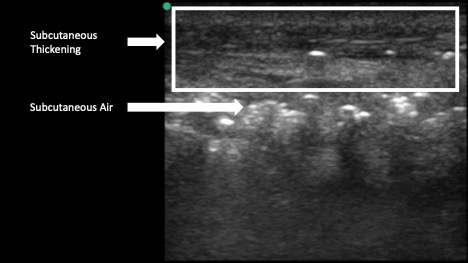

Video 7: PoCUS suggesting necrotizing infection
Courtesy of EDSONOshare Library
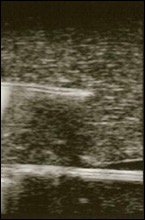
Research has shown that over one-third of hand foreign bodies are missed at the index visit. Bedside ultrasound can be used to both diagnose foreign bodies and plan removal by accurately identifying the depth of the target and surrounding structures which may need to be avoided (i.e., vasculature). Ultrasound is superior to plain films for radiolucent objects such as plastic, wood or plant matter. When using ultrasound to guide removal of a foreign body, be sure to measure the distance from the skin surface with the calipers and scan the object in 2 planes to fully characterize its length, depth and width.
| Practice Pearl: When using ultrasound to guide removal of a foreign body, consider placing multiple high gauge needles to mark the location of the object prior to dissecting down to find and then remove the foreign body. This can save a lot of time and avoid unnecessarily damaging tissue. |
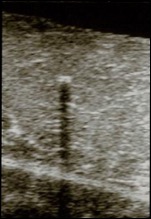
Figure 6: Foreign bodies on bedside ultrasound
| Wood | Glass | Metal |
 |
 |
 |
| Wood often demonstrates attenuation artifact or acoustic shadow. | Glass often demonstrates reverberation or comet tail artifact. | Metal often demonstrates reverberation artifact on ultrasound. |
Video set 8: Soft tissue foreign bodies
Wood
Glass
Metal
Courtesy of EDSONOshare library