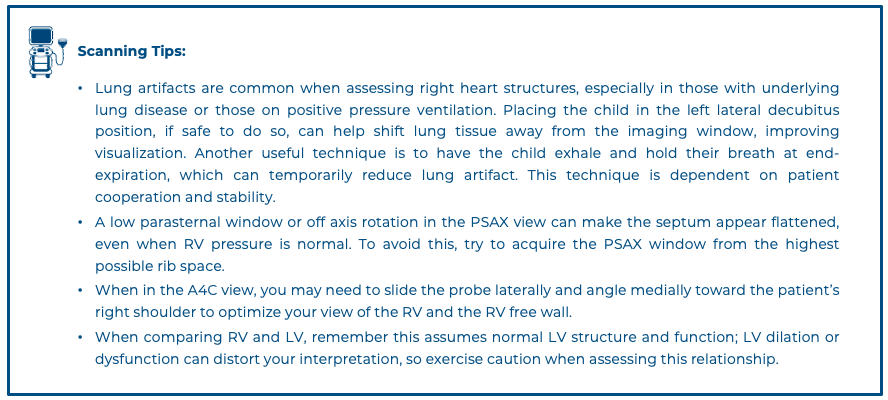
Introduction
Right ventricular (RV) strain refers to the state of increased pressure or volume overload that impairs RV function. These processes can lead to structural and functional changes in the RV that can be detected on ultrasound. RV strain is a critical consideration in pediatrics, particularly in cases of acute respiratory distress syndrome (ARDS), pulmonary hypertension, diffuse myocarditis and ). These clinically significant conditions highlight the importance of assessing RV morphology and hemodynamics in pediatric patients, especially as it relates to switching to positive pressure ventilation.
Physical exam findings for cardiac symptoms can be inconclusive. The standard of care is generally to request formal cardiology echocardiogram to be interpreted by a cardiologist. This can delay diagnosis and initiation of treatment, compromising patient care, particularly during overnight or weekend hours when cardiology services may be limited.
Point-of-care ultrasound (PoCUS) has emerged as an important tool in the assessment of RV pressure, size and function, offering more timely and focused clinical insights than physical exam alone. Additionally, PoCUS findings can provide cardiologists with relevant preliminary information that helps streamline decision-making and enhance the efficiency of patient care, particularly when images and documentation are captured appropriately and shared with cardiology in real time for review (center specific). If there is concern about an undiagnosed or presumed CHD, consultation with cardiology for formal echocardiogram should not be delayed.
This course focuses on guiding learners through a preliminary assessment for RV strain using PoCUS. While the evaluation of CHDs and valvular abnormalities is common in pediatric cardiology, these are beyond the scope of PoCUS and should be reserved for formal echocardiography. By course completion, learners should feel confident assessing for RV strain using the five standard PoCUS cardiac views.
Why Ultrasound?
Ultrasound has many advantages. It is low cost, portable, and free from ionizing radiation. This, in addition to its ability to look at the heart and its function in real time, makes it the diagnostic modality of choice for cardiac evaluation [1]. PoCUS is now widely available in most emergency departments (EDs), pediatric intensive care units (PICUs) and hospital wards, providing rapid, real-time evaluation of cardiac function in critically ill patients. When managing patients with respiratory or circulatory compromise, prompt and accurate diagnosis is crucial. Adult studies have demonstrated that PoCUS enables clinicians to diagnose more quickly and accurately than clinical assessment alone, facilitating more targeted and timely interventions [2,3]—and in some cases, improving mortality outcomes [4,5].
The ability of cardiac PoCUS to evaluate RV strain in pediatric patients is limited in the current literature. However, several adult studies, primarily in the context of suspected pulmonary embolism, have demonstrated that physicians without formal cardiology training can reliably assess RV morphology, pressure, and function using cardiac PoCUS following appropriate training [6-9]. Reported diagnostic performance varies but generally shows moderate to high agreement with formal imaging (CTA or formal echocardiography), with reported sensitivities ranging from 50% to 100% and specificities up to 98%.
To date, only one pediatric study has specifically evaluated the diagnostic accuracy of cardiac PoCUS for assessing RV size and function. Ns, following focused PoCUS training, used RV size, Tricuspid Annular Plane Systolic Excursion (TAPSE), and visual assessment of RV function to evaluate RV strain. Their interpretations showed perfect agreement with formal echocardiography (κ = 1) and substantial agreement with blinded cardiologist review (κ = 0.72), with both sensitivity and specificity reported at 100% [10].
PoCUS facilitates repeatable scanning, allowing practitioners to monitor the effectiveness of interventions and changes in RV filling and preload, and structure and function over time. PoCUS is a skill that can be learned and acquired through training, including both didactic and hands-on practice. Research supports that once undergoing short but dedicated training, PoCUS can safely and accurately be used by practitioners at the bedside in both adult and pediatric populations [2, 11-15]. Given these benefits, PoCUS use for cardiac assessments is supported by various professional societies [16,17].
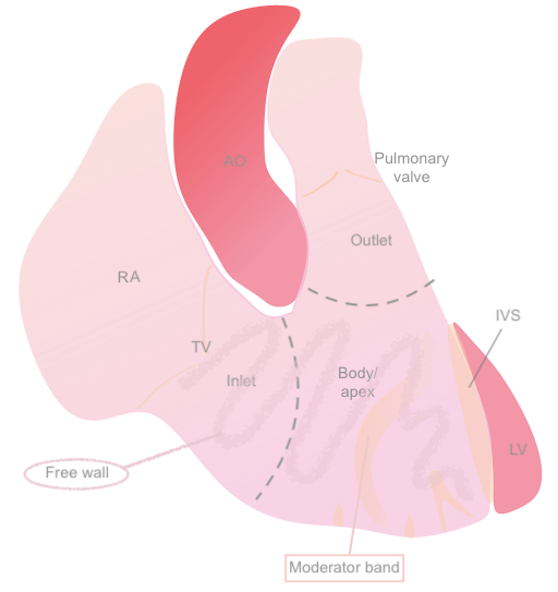 Figure 1: Anatomical diagram of the RV
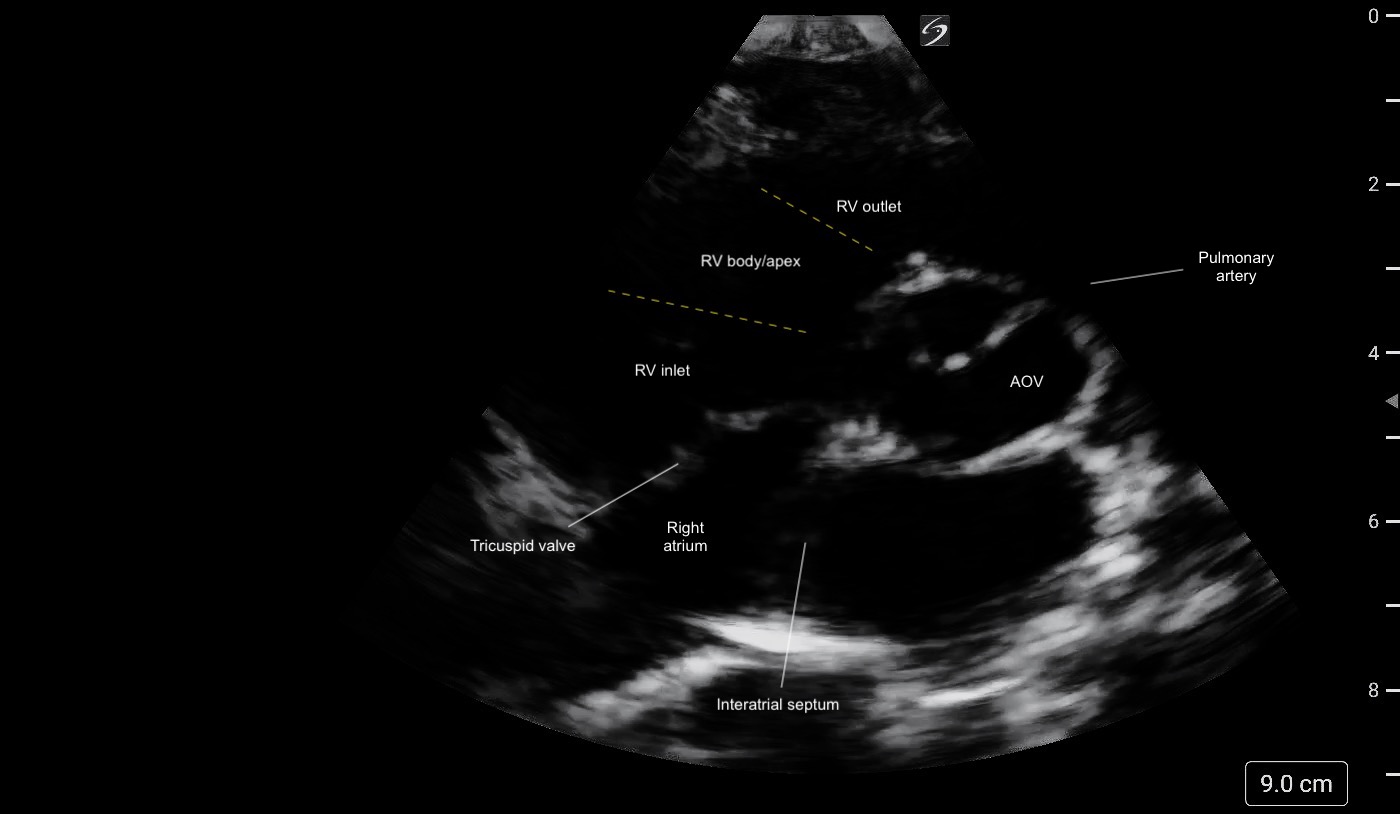 Figure 2: PSAX (aortic level) view illustrating the different regions of the RV and its crescent shape.
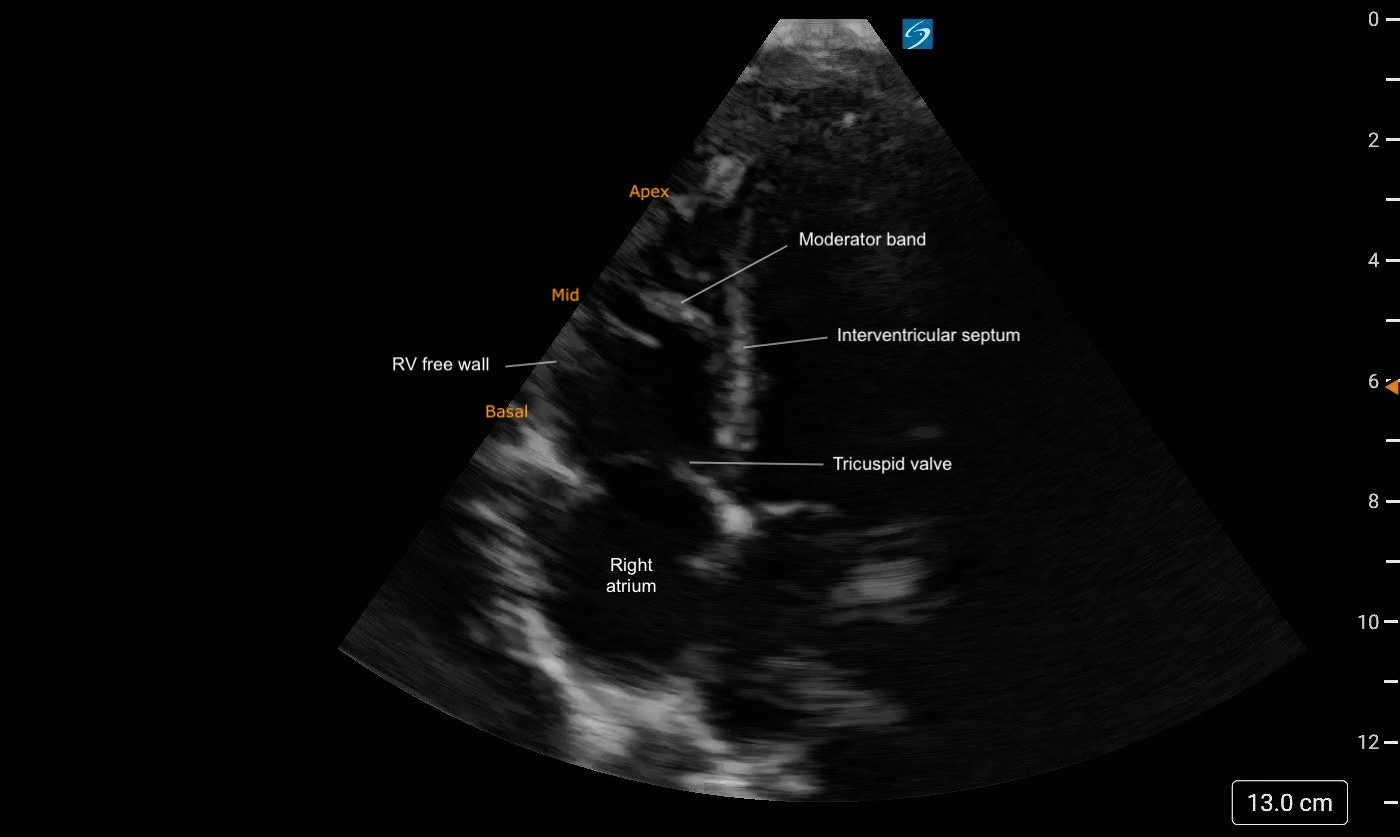 Figure 3: A4C Right heart focused view labeled. Note the trabeculations present at the apex of the RV