What is Normal

What is Normal

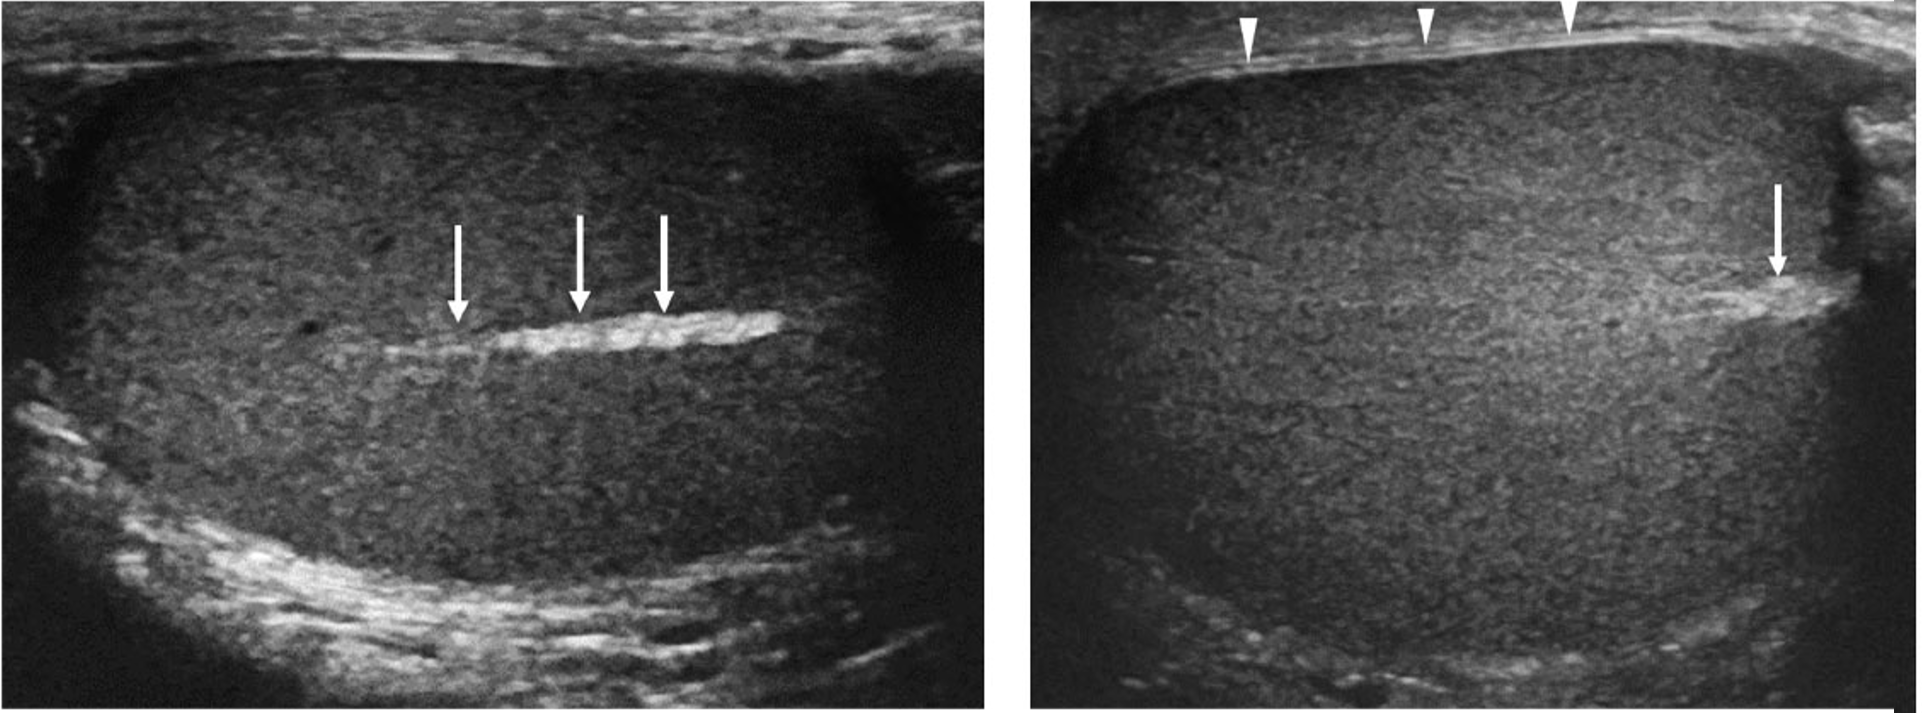
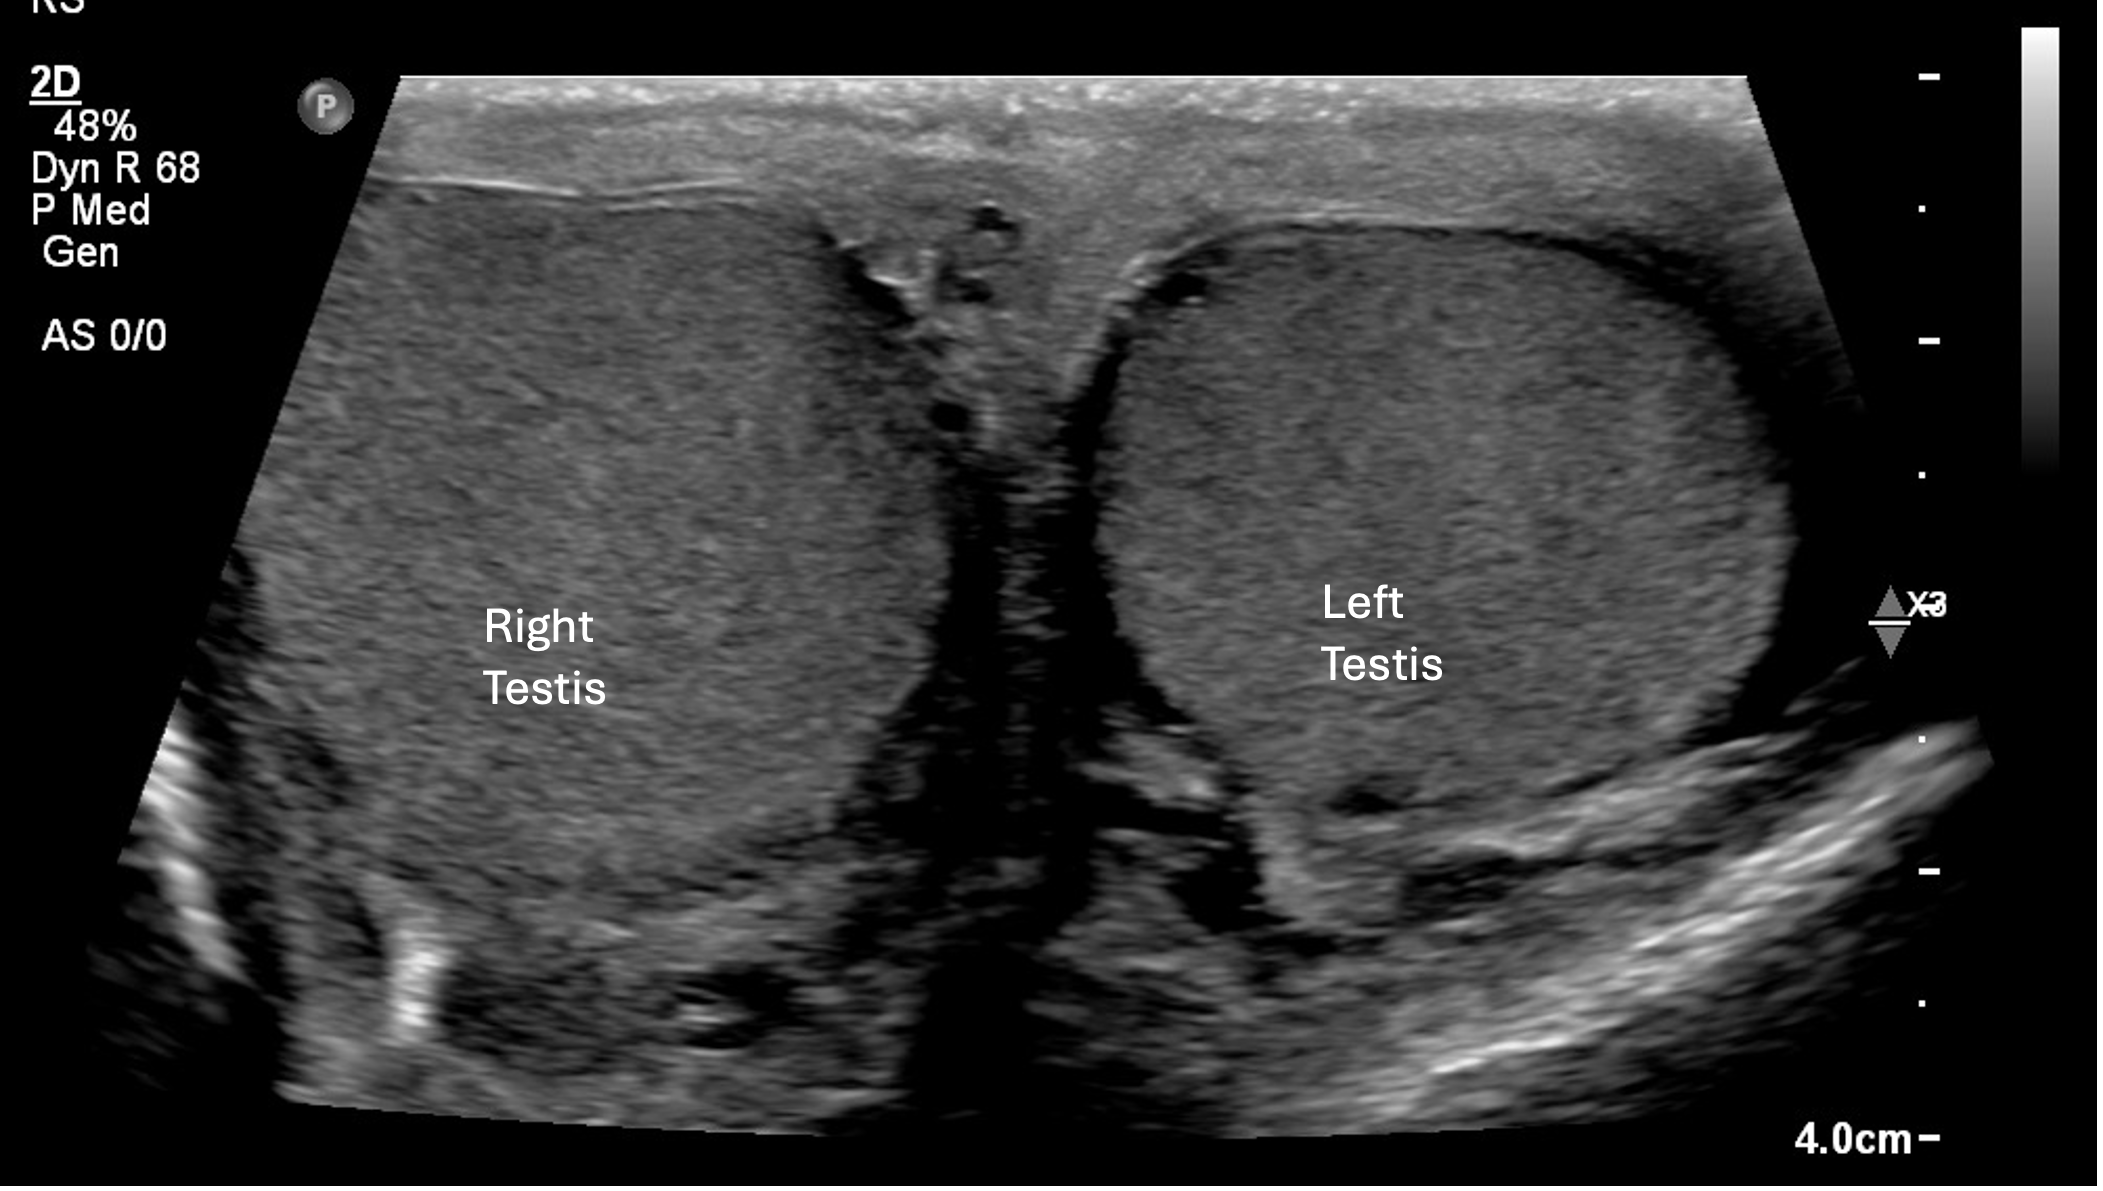
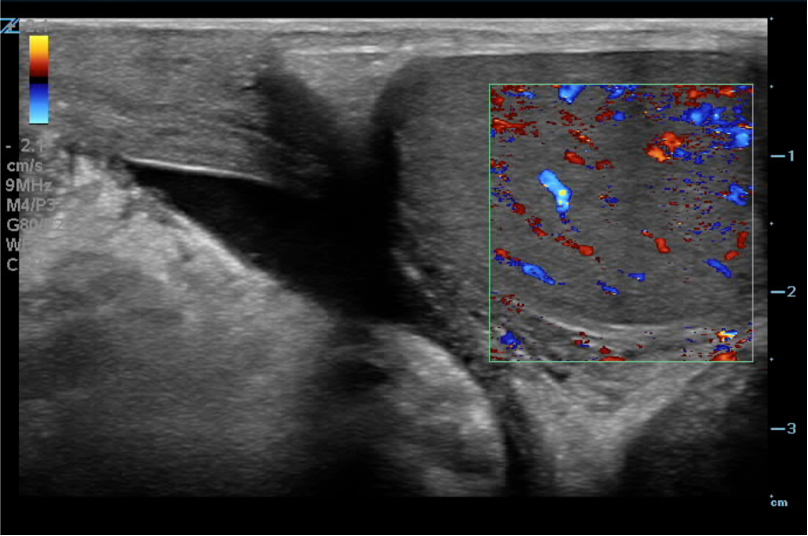
A normal testicle will be ovoid shaped with a vertical lie. The echogenicity on gray scale US should be uniform and homogonous. You should see the tunica albuginea lining the outside of the testicle as a thin, hyperechoic rim. The mediastinum testis is a hyperechoic band crossing the center of the testicle, best seen in the longitudinal view (Figure 3); however, it may not always be visible, and in the setting of trauma, it can be mistaken for pathology. The epididymis is seen adjacent to the testis and is slightly hypoechoic relative to the testis (figure 4).  In color flow doppler, the testicles should have blood flow equal bilaterally. Look for presence of arterial blood flow in the center of the testicle (Figure 5). Peripheral capsular vessels are often larger and easier to detect on Doppler imaging than the smaller intratesticular vessels. Symmetric flow should be identified within the central testicular parenchyma, not just around the periphery.


In prepubertal children, intratesticular blood flow is often low-flow and more difficult to detect, even in healthy testicles. Smaller vessel size and slower flow velocities can make Doppler assessment technically challenging, particularly with PoCUS or lower-sensitivity ultrasound systems. Careful optimization of Doppler settings and direct side-to-side comparison are especially important in this age group. If similarly low-flow appearances are seen bilaterally, this may reflect normal prepubertal physiology. In contrast, low flow on only one side should raise concern for pathology, including torsion.

If blood flow is difficult to identify or findings are uncertain, store representative clips and images and proceed with formal diagnostic ultrasound assessment.


The spermatic cord should appear as a smooth linear echogenic structure in the longitudinal plane and as multiple small round or oval tubular structures in the transverse plane. On color Doppler imaging, vascular flow should be visible within the spermatic cord vessels.


Figure 3. Normal testicles in longitudinal view. The arrows are pointing to the mediastinum testis which is a normal finding. The arrowheads are outlining the tunica albuginea [13]


Figure 4. Normal testicles in transverse view


Figure 5. Color flow doppler of normal testicle in longitudinal view

Video 1: Normal color doppler of the left testicle. Video courtesy of David Kirschner, used with permission.

Stepwise Technique

Begin with Unaffected Testicle


1. Apply a COPIOUS amount of gel over the scrotum

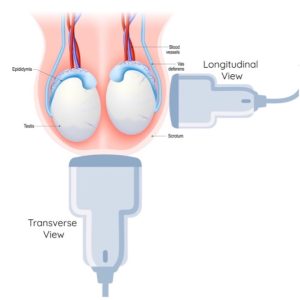
2. 2D Grey scale assessment: Start in 2D gray scale mode and scan each testicle in both the transverse and longitudinal planes (Figure 2). This can be used to assess testicle size, lie and texture.

· Transverse orientation: probe marker pointed to patient RIGHT.

· Longitudinal orientation: probe marker pointed CRANIALLY.


3. Evaluate with color Doppler: In the longitudinal view, select the color doppler function to assess flow to the testicle.

·  Be sure to use a low flow Doppler setting and adjust the color gain as needed to optimize visualization—ensure it’s neither too low, which may cause missed flow signals, nor too high, which can obscure the image with noise.


4. Evaluate with spectral Doppler (if required by your local policy): with the color Doppler still activated, select the pulsed-wave Doppler function and place the sample box over a prominent vessel. Record a spectral tracing of arterial and venous flow (if possible).


5. Evaluate the Spermatic Cord: In the longitudinal plane, slide the probe superiorly along the length of the spermatic cord. Use greyscale and color Doppler to assess for abnormal twisting.

·  Store clips in both planes regardless of whether it appears normal or abnormal.


6. Buddy View or Dual Testicle Comparison: If you have a large linear probe, position the probe in the transverse plane at the inferior scrotum and apply minimal upward pressure to lift both testicles. This allows for direct visualization of both testicles simultaneously to compare size, texture, lie, and color Doppler flow.

·  If using the small linear probe, assess each testicle individually and save images to compare—be careful to not change settings on the machine between sides.

·  Compare to the affected testicle for increased, decreased, or absent flow

·  Obtain both 2D and color Doppler clip or image


Repeat steps 2-5 on the unaffected testicle

Be sure to document and store images at each step of the exam, including both the affected and unaffected sides


Scanning Tips:

  • Optimize color Doppler settings (including gain and PRF/scale) on the unaffected testicle first to achieve the best possible visualization of normal intratesticular flow prior to comparing sides.
  • Be sure NOT to change any of the color Doppler settings between the unaffected and affected testicles, as changes in gain, scale, or other Doppler parameters can create the false appearance of differences in vascularity and make side-to-side comparison unreliable.
  • Be mindful that capsular vessels are often larger and easier to detect on Doppler imaging than intratesticular vessels. Ensure color Doppler demonstrates flow within the central testicular parenchyma, and that spectral Doppler sampling is obtained from an intratesticular vessel rather than a capsular vessel, as capsular flow may still be preserved in early, partial or intermittent torsion.
  • Venous flow may be difficult to capture on spectral Doppler. Make up to three attempts; if venous flow cannot be obtained, proceed with the examination
  • It is best practice to clearly label all images and clips as left or right at the time of acquisition to ensure accurate interpretation and side-to-side comparison during review by radiology and urology.
  • Use a very light probe pressure to avoid compressing, displacing or rotating the testicle. You can rest your elbow or forearm on the patient’s legs or a stack of towels to help stabilize your hand and maintain gentle, controlled pressure.
  • The testicles are mobile structures, so their position and orientation within the scrotum may vary between sides. When obtaining a buddy view, the probe may need to be rotated slightly clockwise or counterclockwise to accommodate their position and ensure both testicles are within the field of view


Figure 2. Ultrasound image acquisition of the testicles in the transverse and longitudinal planes. Note, the probe positions shown are a general guide and may be adjusted based on the position of the testicle. Sagittal views may be obtained from either the lateral or anterior scrotum, while transverse views may be obtained from either an inferior or anterior approach.

Indications

Indications

  • Rule in testicular torsion in acute testicular pain


Equipment

  • Ultrasound machine
  • Probe: high frequency linear probe (ex. 5-12 MHz)
  • Ultrasound gel
  • Towels for draping, patient positioning, and clean up


Patient Positioning

Position the patient supine and support the scrotum with towels. The penis can be positioned dorsally and draped with towels to expose only the testicles


Testicular Anatomy Review

Testicular Anatomy Review


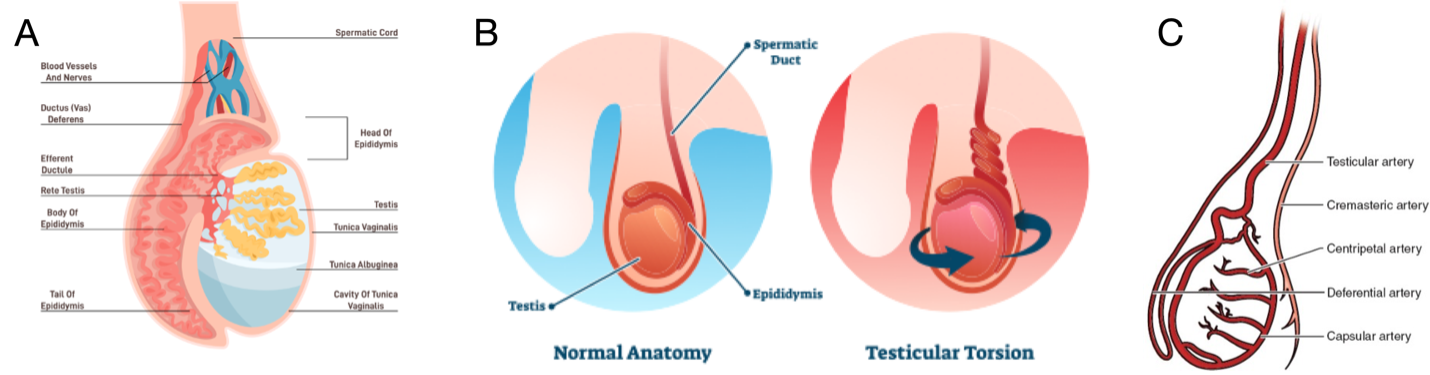
In a patient with normal anatomy (Figure 1A), the scrotum is divided into left and right by the scrotal septum. Each compartment contains a testis, an epididymis, and the spermatic cord. The testicle is covered by a fibrous capsule called the tunica albuginea. This capsule projects into the testicle to form the mediastinum testis. Testicular seminiferous tubules run through the mediastinum testis and exit the testicle to form the epididymis which continues as the vas deferens. The spermatic cord contains the vas deferens as well as testicular vessels and nerves.  


In testicular torsion, the testicle spins, twisting the spermatic cord and causing compression of the blood vessels (Figure 1B), thereby limiting venous outflow and arterial inflow (Figure 1C).  


Figure 1. A) Normal testicular anatomy. B) Testicular torsion demonstrating torsion of the spermatic cord C) Arterial supply to the testicle  

Introduction

Introduction

Testicular torsion (TT) is a common urological emergency with the majority of cases occurring in adolescence, making this an important presentation to pediatric emergency departments (EDs). TT accounts for 10-15% of pediatric acute scrotum (1). Testicular torsion typically presents with acute onset, unilateral testicular pain, and may be associated with nausea and vomiting. The differential diagnosis of TT is broad and includes more common diagnoses such as epididymo-orchitis and torsion of the appendix testis (1). 

Cases that are highly suggestive of testicular torsion warrant immediate consultation with urology for de-torsion; however, in cases where the diagnosis is uncertain or at the request of the surgical team, doppler ultrasound is used to confirm the diagnosis prior to surgical intervention. 

 Certain clinical features are highly suggestive of the diagnosis of TT. The Testicular Workup for Ischemia and Suspected Torsion (TWIST) score (Table 1) was developed to help diagnose TT and decrease the use of ultrasound (2,3) . Low TWIST score (0-2) has a sensitivity 98% which allows ruling out TT and high TWIST (5-7) has specificity of 97% which allows ruling in the diagnosis. Ultrasound is helpful to confirm the diagnosis for the intermediate (2-4) risk group (2,4,5)


Table 1. TWIST score for clinical suspicion of testicular torsion. 

Testicular swelling  2 points 
Hard testis on palpation  2 points 
Absent cremasteric reflex   1 point 
High riding testis   1 point 
Nausea or vomiting  1 point 


Delayed diagnosis of TT is associated with loss of testis and infertility. Cases that are highly suggestive of testicular torsion warrant immediate surgical consultation. The European Associatione of Urology 2024 recommendations for pediatric TT include that the clinical decision should be based on physical examination and ultrasound can be used as an adjunct that should not delay definitive care (6). In confirmed cases of TT, early surgical exploration is warranted. 


Why PoCUS?

Studies consistently show that the most important factor for testicle viability is the duration of ischemia (7–9). Salvage of the testicle diminishes significantly after 6 hours, making early identification of this condition extremely important for improved patient outcomes (9). The median time from symptom onset to ED presentation for patients with possible TT is 4 hours – leaving only 2 hours for triage, ED physician assessment, work-up, urology consultation and transfer to the operating room to improve chances of testicular viability (7). Delays to definitive care in patients with TT are a preventable cause of orchiectomy in young men (7,10). PoCUS is an easily accessible bedside tool that can be used to expedite care for these patients. It can also help with resource allocation of our radiology performed ultrasounds, especially at centers where this is not readily available 24 hours a day. PoCUS can be used to rule in TT and has been shown to decrease time to OR for testicular torsion and decreased length of stay in ED (10,11). 


Testicular PoCUS skills can be acquired rapidly. Competency and skill confidence was achieved by urology and emergency resident following a curriculum which included three audio lectures followed by 1-hour of hands-on practice (12). The test characteristics of PoCUS vs RADUS are demonstrated in Table 2.   


Table 2: Test characteristics of radiology performed ultrasound vs. point-of-care ultrasound for testicular torsion (10) 

  Radiology US         Point of Care US       
Sensitivity     100%  95% 
Specificity     98%  93% 
Positive predictive value     83%  46% 
Negative predictive value     100%  100% 
Median time for performing US      61 minutes  23 minutes 


KidSONO: Testicular Torsion


Author: Jade Seguin, MD, FRCPC
Secondary Author: Michelle Fric, MD, FRCPC
Reviewer(s): Christopher Chan, MD, FRCPC, Mark Bromley, MD, FRCPC, Melanie Willimann, MD, FRCPC, Colin Bell, MD, FRCPC, Omar Damji, MD, FRCPC, Julia Stiz, MSc, RDMS


*To continue through to the course, make sure to select the “Mark as Completed” button below.


By selecting the “Mark as Complete” button below, I acknowledge that:

  • This activity is educational only.
  • Completion does not grant certification, credentialing, privileging, or independent authorization to perform point-of-care ultrasound.
  • I am responsible for practicing within my professional scope, training, local institutional policies, supervision requirements, and regulatory requirements.
  • I will not rely on point-of-care ultrasound findings in isolation when making clinical decisions.
  • Any clinical use of point-of-care ultrasound remains subject to local governance, quality assurance, documentation, and patient safety processes.

References

**To unlock access to the first quiz, make sure to select the “Mark as Completed” button below

References

1. Alrajhi K, Woo MY, Vaillancourt C. Test characteristics of ultrasonography for the detection of pneumothorax: a systematic review and meta-analysis. Chest 2012;141:703-8. doi:10.1378/chest.11-0131.

2. Seow et al. Comparison of Upright Inspiratory and Expieratory Chest Radiographs for Detecting Pneumothoraces. AJR 1996; 166:313-316. doi: 10.2214/ajr.166.2.8553937.

3. Murphy et al. CT and Chest Radiography are Equally Sensitive in the Detection of Pneumothorax After CTGuided Pulmonary Interventional Procedures. AJR 1990;154:45-46. doi: 10.2214/ajr.154.1.2104723.

4. Raimondi et al. Lung Ultrasound for Diagnosing Pneumothorax in the Critically Ill Neonate. J Pediatr 2016;175:74-8. doi:10.1016/j.jpeds.201.04.018

5. Cattarossi et al. Lung Ultrasound Diagnostic Accuracy in Neonatal Pneumothorax. Canad Resp J. 2016. doi 10.1155/2016/6515069

6. Liu et al. Lung ultrasonography to diagnose pneumothorax of the newborn. AJEM 2017;35:1298-1302. doi: 10.1016/j.ajem.2017.04.001.

7. Volpicelli et al. Semi-quantification of pneumothorax volume by lung ultrasound. Int Care Med 2016;40:14607. doi:10.1007/s00134-014-3402-9.

Archiving


In addition to documenting findings in the patient chart, users are strongly encouraged to archive representative images and clips from their examinations. Archiving supports communication regarding ongoing care, QA, feedback, learner development, and clinical documentation.

Prior to scanning, ensure the correct patient information is entered into the ultrasound system. At minimum, archived studies should include appropriate patient identifiers (e.g name or accession number), operator information, exam type, and representative images/clips that support your interpretation.

Images should only be stored using approved institutional archiving systems and in accordance with local privacy policies.

The exact archiving workflow may vary depending on the ultrasound machine being used. However, the following general steps apply to most systems and should be followed whenever possible.

  1. Select “New Patient”
  2. Enter patient identifiers (name, ID, accession number etc.)
  3. Enter operator details
  4. Select “scan” or “start”
  5. Save representative images/clips
  6. Select “end study” or “end exam”
  7. Confirm successful upload to the institutional archiving system


*Most ultrasound equipment will automatically push the study to the archiving system. In some cases, studies may not automatically upload due to network interruptions, archive connectivity issues, or local machine configuration. In these situations, a manual transfer may be required.

      1. Open the patient list
      2. Select the exam/patient you wish to archive
      3. Select “send to”
      4. Select “archive”
      5. Choose desired archive destination/server
      6. Select “send”
      7. Confirm successful upload to DICOM server


Figure 16. Archiving Status


Q-Path

QPath is a commonly used ultrasound image management and archiving platform and is used at Alberta Children’s Hospital and many other institutions. Depending on your site, a different archiving or review platform may be used.

QPath allows users to:

· Review ultrasound images and clips

· Participate in quality assurance (QA) review (if done at your local site)


Access and Login

Access to QPath requires site-specific authorization. User accounts are typically created and managed by local administrators or ultrasound leadership.

Once access has been granted:

    1. Navigate to the institutional QPath login page
    2. Enter your username and password and login


*For AHS users, the link for accessing Qpath is: http://wsqpathapp02.healthy.bewell.ca/

*If accessing Qpath remotely, you will first need to connect to the healthcare institutions VPN using your RSA token, then proceed to the Qpath login page


Platform Navigation

When QPath is opened, users are typically brought directly to the exam list page. This page displays available studies and allows users to search, filter, and open examinations for review.

Studies can be searched using patient identifiers or filtered based on criteria such as operator/provider, study type, exam date, and patient identifiers.

The left sidebar provides access to key navigation functions (figure 17):

· Home – Returns to the main exam list/dashboard.

· Browse– Opens search and filtering options for archived studies.


The top sidebar provides function such as (figure 17):

· Refresh – Refreshes the study list.

· Open – Opens the selected study.

· Edit – Add or edit patient, exam or operator details.

· Export – Don’t use this function. It is best to export studies under the image operations function.

· Image operations – Allows you to select all or specific images within the exam to export.

· Export grid – Do not use this function. This will print a CSV file of all the exams/patient details on the exam list.


Figure 17. Qpath exam list page and functions


Once a study is opened, additional tools become available in the top toolbar (figure 18).

· Navigating through studies – previous or next exam.

· Edit – add or edit patient, exam or operator details.

· Submit for QA – allows you to select a reviewer for your exam and submit the exam for QA (if QA is done through Qpath at your local site)

· Image operations – allows you to select all or specific images within the exam to export.

Figure 18. Exam specific top bar tools on Qpath


Editing an Exam

Accurate patient, exam, and provider information is important for study identification and the QA review process. Ideally, these details should be entered prior to beginning an examination. However, if clinical circumstances or time constraints do not permit, they may be added or updated afterwards within QPath. Users should try to make it routine practice to enter and verify this information at the time of scanning whenever possible.

Editable information includes patient identifiers (name, ID, birthdate), exam information (date, exam type, comments) and provider information.  Select “Edit” to modify the desired fields, then select “Save” to apply the changes.


Reviewing an Exam

QPath includes image review and annotation tools that allow users to review cine clips, slow playback speed, annotate images (add text, perform measurements) adjust image layouts, and manage saved images. These functions can be found in the bottom right-hand corner, once an exam is opened.


Figure 19. Qpath image review and annotation tools


Privacy and De-identification of Exported Images

It is important to note that although the export function attempts to obscure patient names, this may not always be done completely (e.g., portions of the patient name may remain visible). Exported images may also continue to display patient identifiers such as accession or ID numbers. Users are responsible for ensuring all exported images and studies are appropriately de-identified prior to use or sharing.

All exported files must be handled in accordance with institutional privacy and confidentiality policies.