**To unlock access to the first quiz, make sure to select the “Mark as Completed” button below
References
- Patel, G et al. Point-of-Care Cardiac Ultrasound (POCCUS) in the Pediatric Emergency Department. Clinical Pediatric Emergency Medicine. 2018. 19: 323-327. DOI: 10.1016/j.cpem.2018.12.009
- Guevarra K, Greenstein Y. Ultrasonography in the Critical Care Unit. Curr Cardiol Rep. 2020;22(11):145. doi:10.1007/s11886-020-01393-z
- Volpicelli G, Lamorte A, Tullio M, et al. Point-of-care multiorgan ultrasonography for the evaluation of undifferentiated hypotension in the emergency department. Intensive Care Med. 2013;39(7):1290-1298. doi:10.1007/s00134-013-2919-7
- Potter SK, Griksaitis MJ. The role of point-of-care ultrasound in pediatric acute respiratory distress syndrome: emerging evidence for its use. Ann Transl Med. 2019;7(19):507-507. doi:10.21037/atm.2019.07.76
- Mojoli F, Bouhemad B, Mongodi S, Lichtenstein D. Lung Ultrasound for Critically Ill Patients. Am J Respir Crit Care Med. 2019;199(6):701-714. doi:10.1164/rccm.201802-0236CI
- Daley JI, Dwyer KH, Grunwald Z, et al. Increased Sensitivity of Focused Cardiac Ultrasound for Pulmonary Embolism in Emergency Department Patients With Abnormal Vital Signs. Runyon MS, ed. Academic Emergency Medicine. 2019;26(11):1211-1220. doi:10.1111/acem.13774
- Taylor RA, Moore CL. Accuracy of emergency physician-performed limited echocardiography for right ventricular strain. The American Journal of Emergency Medicine. 2014;32(4):371-374. doi:1016/j.ajem.2013.12.043
- Popat A, Yadav S, Pethe G, Rehman A, Sharma P, Rezkalla S. The role of POCUS in diagnosing acute heart failure in the emergency department: A meta-analysis. Journal of Cardiology. Published online June 2025. doi:1016/j.jjcc.2025.06.012
- Dresden S, Mitchell P, Rahimi L, et al. Right Ventricular Dilatation on Bedside Echocardiography Performed by Emergency Physicians Aids in the Diagnosis of Pulmonary Embolism. Annals of Emergency Medicine. 2014;63(1):16-24. doi:1016/j.annemergmed.2013.08.016
- Chico S, Connolly S, Hossain J, Levenbrown Y. Accuracy of Point‐Of‐Care Cardiac Ultrasound Performed on Patients Admitted to a Pediatric Intensive Care Unit in Shock. J of Clinical Ultrasound. 2025;53(3):445-451. doi:1002/jcu.23883
- Griffee MJ, Merkel MJ, Wei KS. The role of echocardiography in hemodynamic assessment of septic shock. Crit Care Clin. 2010;26(2):365-382, table of contents. doi:10.1016/j.ccc.2010.01.001
- Watkins LA, Dial SP, Koenig SJ, Kurepa DN, Mayo PH. The Utility of Point-of-Care Ultrasound in the Pediatric Intensive Care Unit. J Intensive Care Med. Published online October 9, 2021:088506662110478. doi:10.1177/08850666211047824
- Gaspar HA, Morhy SS. The Role of Focused Echocardiography in Pediatric Intensive Care: A Critical Appraisal. BioMed Research International. 2015;2015:1-7. doi:10.1155/2015/596451 de Boode WP, van der Lee R, et al. The role of Neonatologist Performed Echocardiography in the assessment and management of neonatal shock. Pediatr Res. 2018;84(S1):57-67. doi:10.1038/s41390-018-0081-1
- Arnoldi S, Glau CL, Walker SB, et al. Integrating Focused Cardiac Ultrasound Into Pediatric Septic Shock Assessment*. Pediatric Critical Care Medicine. 2021;22(3):262-274. doi:10.1097/PCC.0000000000002658
- Ranjit S, Aram G, Kissoon N, et al. Multimodal Monitoring for Hemodynamic Categorization and Management of Pediatric Septic Shock: A Pilot Observational Study*. Pediatric Critical Care Medicine. 2014;15(1):e17-e26. doi:10.1097/PCC.0b013e3182a5589c
- Singh Y, Tissot C, Fraga MV, et al. International evidence-based guidelines on Point of Care Ultrasound (POCUS) for critically ill neonates and children issued by the POCUS Working Group of the European Society of Paediatric and Neonatal Intensive Care (ESPNIC). Crit Care. 2020;24(1):65. doi:10.1186/s13054-020-2787-9
- Lu JC, Riley A, Conlon T, et al. Recommendations for Cardiac Point-of-Care Ultrasound in Children: A Report from the American Society of Echocardiography. Journal of the American Society of Echocardiography. 2023;36(3):265-277. doi:1016/j.echo.2022.11.010 1.
- Sanz J, Sánchez-Quintana D, Bossone E, Bogaard HJ, Naeije R. Anatomy, Function, and Dysfunction of the Right Ventricle. Journal of the American College of Cardiology. 2019;73(12):1463-1482. doi:1016/j.jacc.2018.12.076
- Kaul S, Tei C, Hopkins JM, Shah PM. Assessment of right ventricular function using two-dimensional echocardiography. American Heart Journal. 1984;107(3):526-531. doi:1016/0002-8703(84)90095-4
- Sato T, Tsujino I, Oyama-Manabe N, et al. Simple prediction of right ventricular ejection fraction using tricuspid annular plane systolic excursion in pulmonary hypertension. Int J Cardiovasc Imaging. 2013;29(8):1799-1805. doi:1007/s10554-013-0286-7 1.
- Nickson C. The Dark Art of IVC Ultrasound. Life in the Fast Lane. Published November 3, 2020. Accessed October 22, 2025. https://litfl.com/the-dark-art-of-ivc-ultrasound/
- EL-Nawawy AA, Omar OM, Hassouna HM. Role of Inferior Vena Cava Parameters as Predictors of Fluid Responsiveness in Pediatric Septic Shock: A Prospective Study. Journal of Child Science. 2021;11(01):e49-e54. doi:1055/s-0041-1724034 1.
- De Souza TH, Giatti MP, Nogueira RJN, Pereira RM, Soub ACS, Brandão MB. Inferior Vena Cava Ultrasound in Children: Comparing Two Common Assessment Methods*. Pediatric Critical Care Medicine. 2020;21(4):e186-e191. doi:1097/PCC.0000000000002240
- POCUS 101. The D Sign – Right Heart Strain from Pressure vs Volume Overload. POCUS 101. Published August 7, 2017. Accessed August 18, 2025. https://www.pocus101.com/the-d-sign-right-heart-strain-from-pressure-vs-volume-overload/
- Mah K, Mertens L. Echocardiographic Assessment of Right Ventricular Function in Paediatric Heart Disease: A Practical Clinical Approach. CJC Pediatric and Congenital Heart Disease. 2022;1(3):136-157. doi:1016/j.cjcpc.2022.05.002
- Conlon TW, Baker D, Bhombal S. Cardiac point-of-care ultrasound: Practical integration in the pediatric and neonatal intensive care settings. Eur J Pediatr. 2024;183(4):1525-1541. doi:1007/s00431-023-05409-y

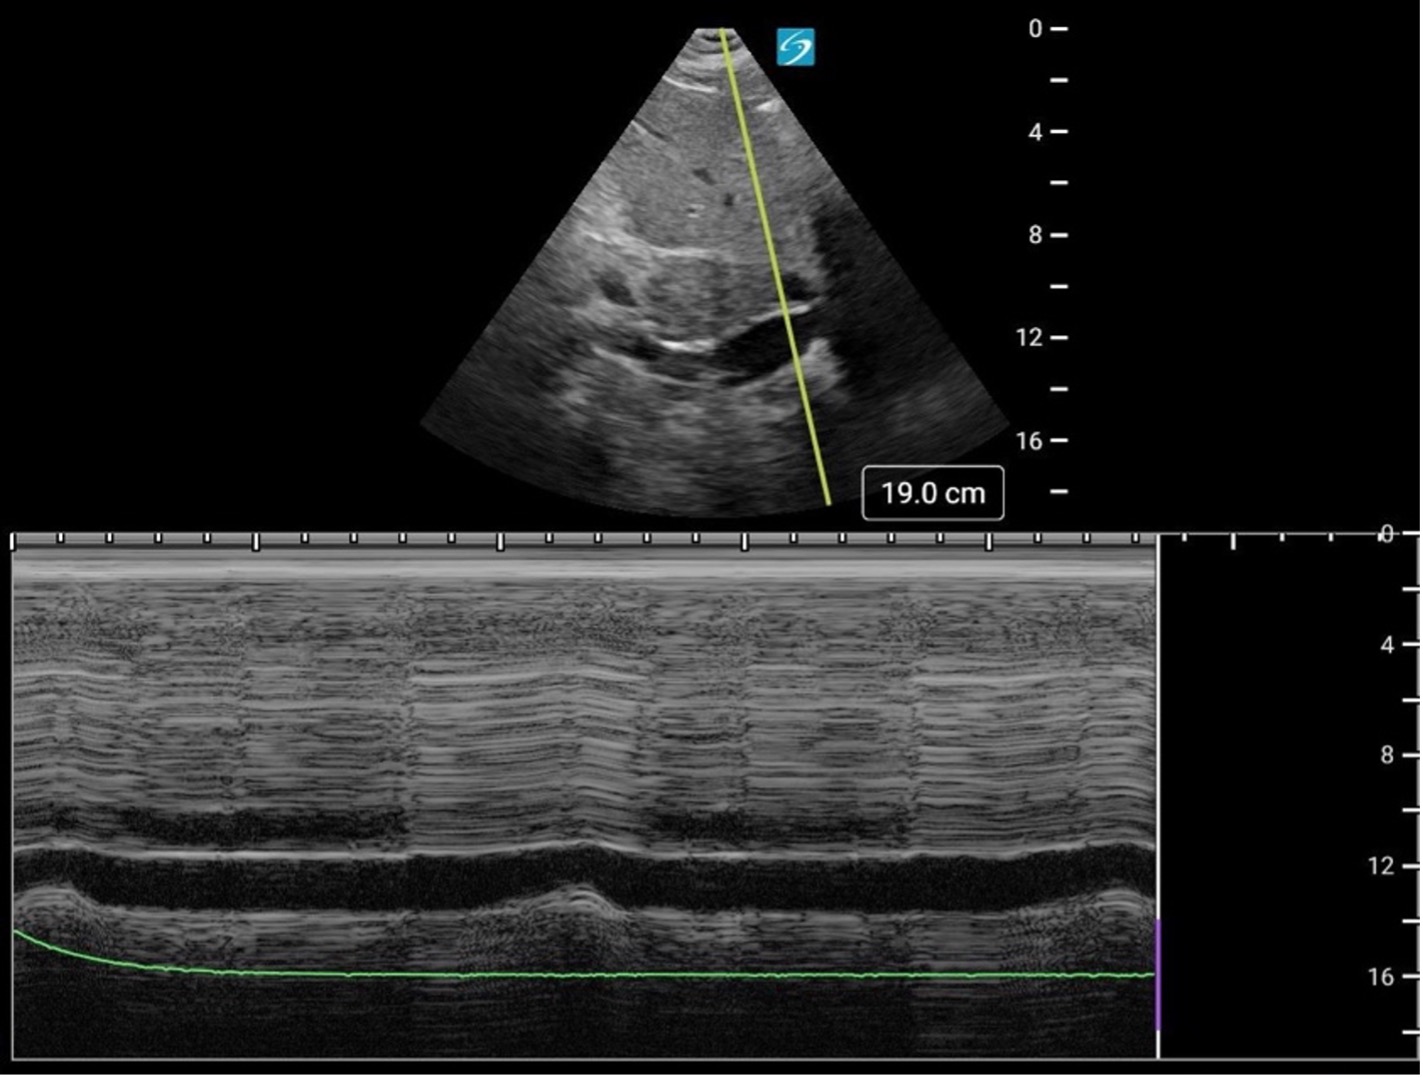
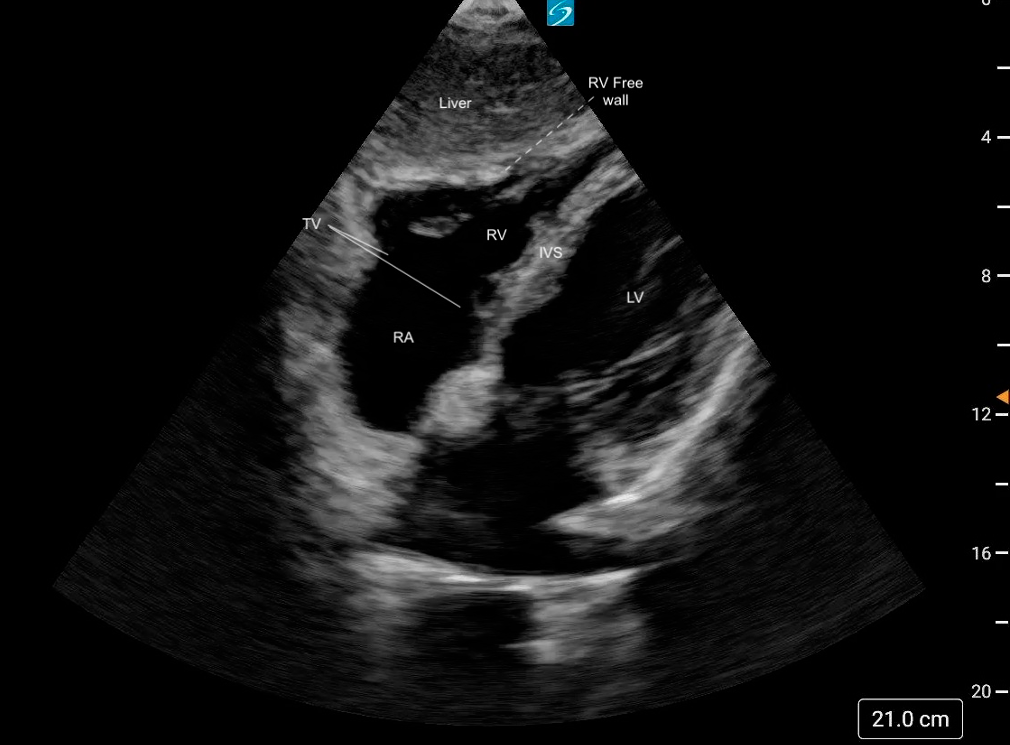

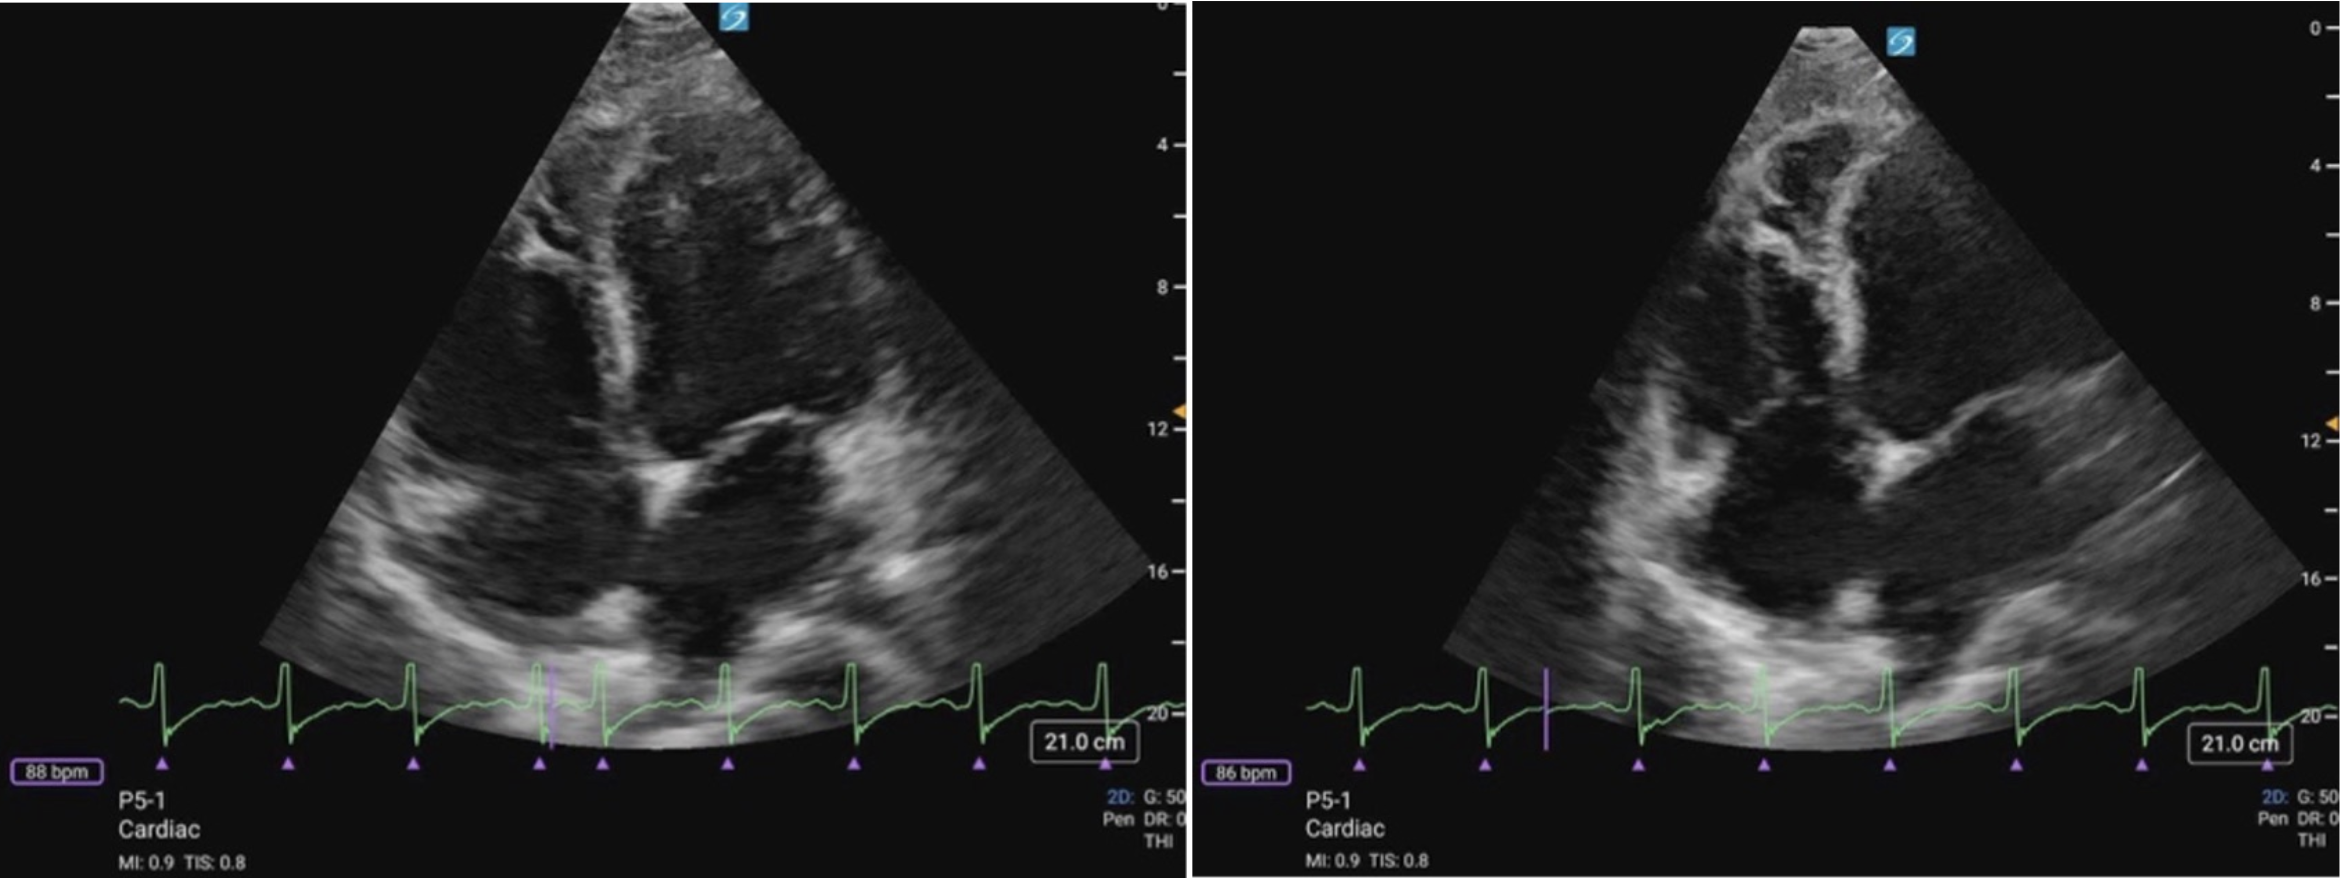 Figure 11 (a) A4C Cardiology convention LV focused compared to (b) RV focused. Note how in the RV focused view, the LV may be out of frame, but the RV free wall and apex are fully visualized.
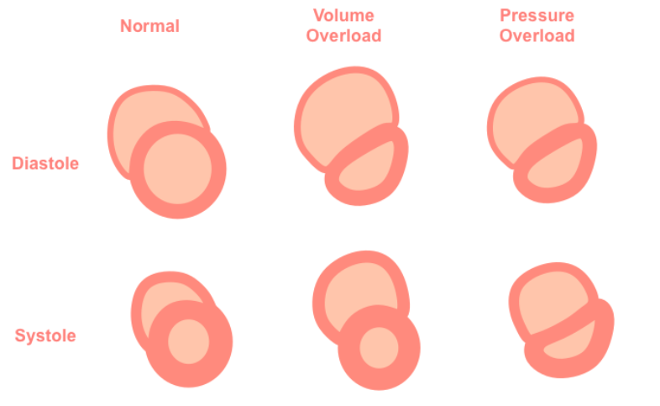
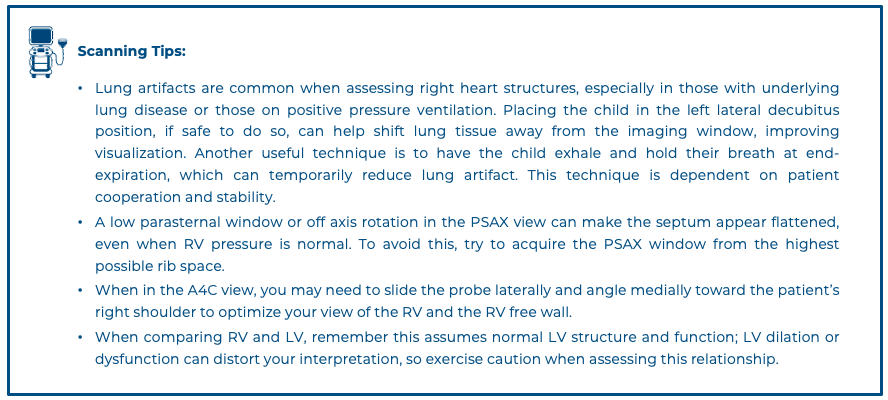
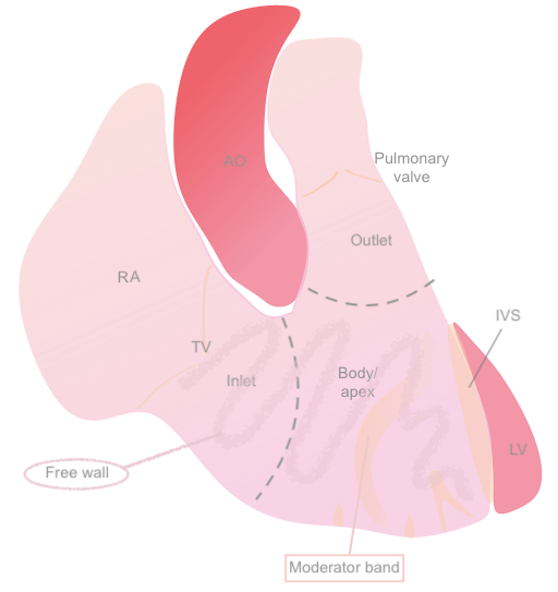 Figure 1: Anatomical diagram of the RV
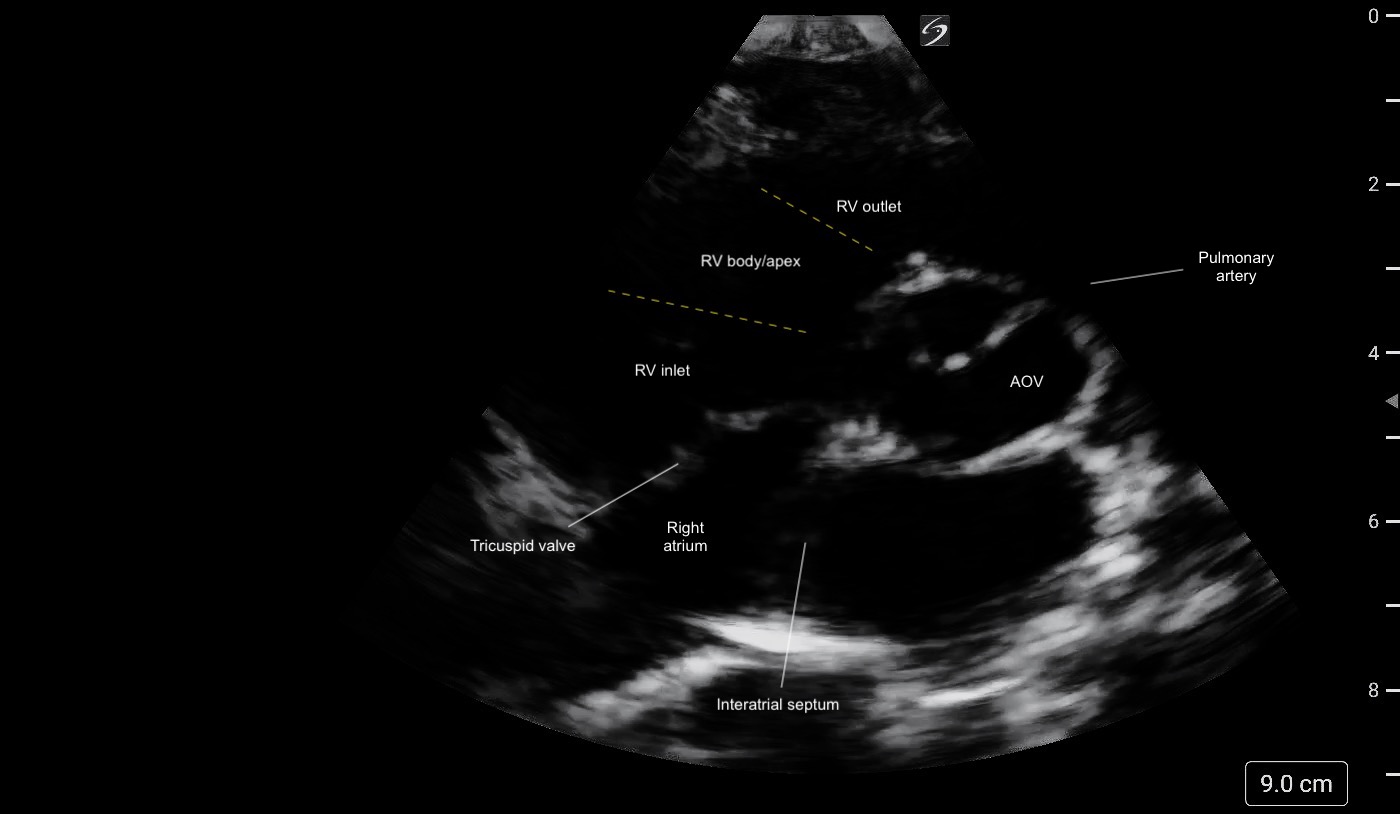 Figure 2: PSAX (aortic level) view illustrating the different regions of the RV and its crescent shape.
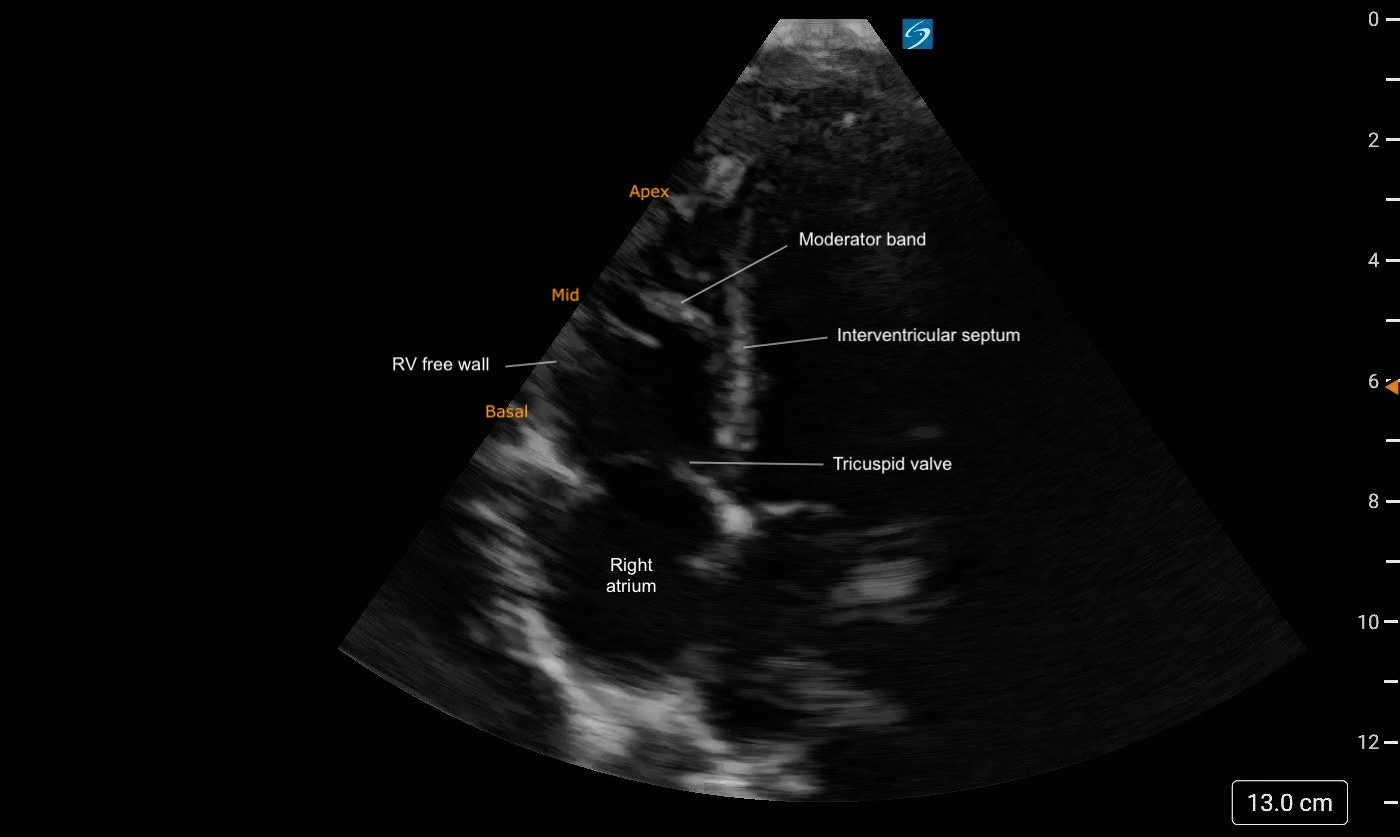 Figure 3: A4C Right heart focused view labeled. Note the trabeculations present at the apex of the RV