What is normal?

What is normal?

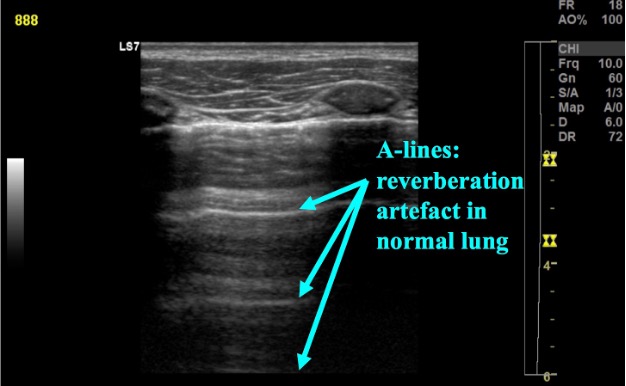
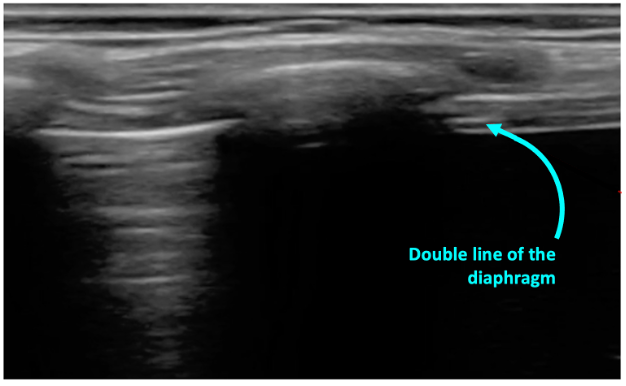
In normal lung, the pleura is easily visualized as ultrasound waves are deflected by aerated lung. Reverberation artifacts from the pleural line (secondary to the significant change in acoustic impedance at the pleural-lung interface) generate horizontally arranged artifacts called A-lines (figure 2). Other normal structures visualized are the rib and corresponding rib shadowing below, and at the base of the lung the double line of the diaphragm muscle (figure 3).


Figure 2: Normal lung with A-line reverberation artefact

Figure 3:  Normal lung base with the beginning of the diaphgram noted on screen right

What am I looking at?

What am I looking at?

It is first important to note the following normal anatomic structures and their sonographic appearance (video 1).

Chest wall:

  •  Most superficial structure
  •  Hypoechoic with irregular fascial lines

Ribs:

  • Oval, hyperechoic periosteumo
  • Dark shadow behind

Pleural line:

  • Hyperechoic horizontal line
  • Runs between and deep to the ribs

Lung:

  • Deep to the pleural line
  • Uniform grey haze

Video 1: Normal lung anatomy

Indications

Indications

  • Dyspnea
  • Cough
  • Fever without a source


Equipment

  • Ultrasound machine
  • High frequency linear probe (6-12 MHz) is most used, although a curvilinear or phased array probe may also be used
  • Gel


Technique 

  1. Position the patient: It is easiest to completely expose the thorax. LUS can be conducted with the patient in any number of positions; in the parent’s arms (helpful for posterior exam), seated on or lying in a stretcher (lateral decubitus can be used to examine the posterior chest).
  2. Warm the gel if possible: Younger or sleeping patients may respond better if the gel is warmed. Consider warming the gel between your gloved hands and applying a layer of warmer gel to the chest.
  3. Scan the patient:
    1. Set the depth to between 5 – 10 cm, choosing the smallest depth that gives an appropriate image to maximize resolution.
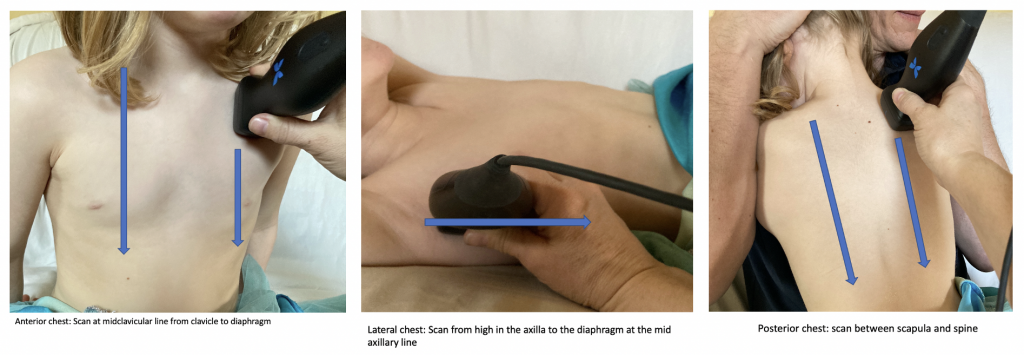
    2. Hold the probe with the marker pointed towards the patient’s head. Starting most cephalad with the probe in a sagittal orientation scan from the lung apex to the diaphragm.
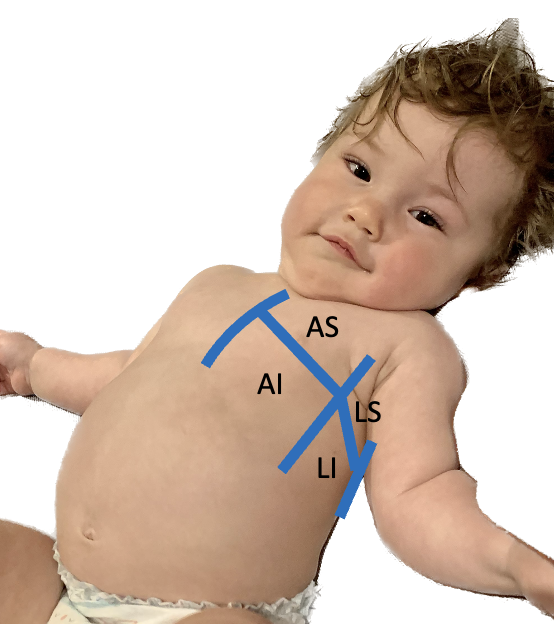
    3. Complete this process in 6 planes: posterior between the spine and the scapula left and right chest, at the mid-axillary line left and right chest, and anteriorly at the midclavicular line left and right chest (figure 1)
    4. For any abnormalities detected, the area should be investigated more by sliding the probe along the rib space or changing the probe to a transverse view to scan in-between the ribs.

Figure 1: Scanning technique for pneumonia

Introduction

Introduction

Pneumonia is a leading cause of death in children around the world. The most common initial test for pneumonia is chest radiograph/x-ray (CXR) despite it having limited sensitivity and exposing children to radiation. Growing evidence shows that point-of-care ultrasound (PoCUS) can reliably detect lung consolidation with equal, if not better, sensitivity than CXR. Computed tomography (CT) provides the best test characteristics but is impractical and carries the cost of significant radiation.

Lung ultrasound (LUS) has excellent test characteristics, is noninvasive, delivers no ionizing radiation, and does not require a patient to be moved to a radiology department. For these reasons there is great potential for its use at the bedside in the diagnosis of pneumonia in children.


Why Ultrasound?

Given that air scatters ultrasound waves, it was traditionally thought that lung ultrasound would not be useful to detect pathology. However, over the last two decades there is a growing body of evidence supporting the use of ultrasound in various lung pathologies. Since lung pathology, such as pneumonia, leads to edema and fluid accumulation within the alveoli, areas of consolidation can be seen on ultrasound as long as this fluid reaches the pleural line. Fortunately, this is the case in most patients, particularly in children who have small lungs.

Several meta-analyses examining test characteristics of LUS for pediatric pneumonia have been published (1,2,3). The initial meta-analysis published in 2015 found a pooled sensitivity of 96% and specificity of 93% and an area under the ROC of 0.98 (3). All studies revealed LUS as equal if not superior to detecting consolidation compared to CXR (1,2,3). In the adult literature, a study comparing the test characteristics of LUS and CXR to the gold standard CT revealed a significantly better sensitivity of lung ultrasound: 86% vs 64%, with similar specificities. (4)

Jones et al. published a randomized-control trial examining the feasibility of replacing CXR with LUS for the diagnosis of pneumonia in children. They showed a 30-60% reduction in the use of CXR, depending on the level of experience of the ultrasonographer, as well as decreased ED length of stay. The inter-rater reliability for LUS in this practical study was 0.81, showing excellent agreement (5). A meta-analysis examining accuracy of LUS in novice vs advanced sonographers did find that novice sonographers had decreased accuracy, but the sensitivity and specificity remained 80% and 96% respectively, with an area under the ROC of 0.97 (6). Though, the question does remain as to what makes someone novice vs expert in LUS.

Additional questions about LUS remain to be answered. Specifically, what is the value of each abnormal finding on LUS and which findings are indicative of bacterial pneumonia necessitating antibiotic treatment? Studies agree that findings such as hepatization, air bronchograms and large subpleural consolidations are consistent with bacterial pneumonia, but focal B-lines, small subpleural consolidation and irregularities of the pleural lining can also be found in viral etiologies. A recent study looking at the significance of sub-centimeter, subpleural consolidations concluded that as an isolated finding, these are not indicative of bacterial pneumonia (7). Further study in this area continues to emerge. Jones et al. raised caution that LUS could unintentionally increase antibiotic usage rates if there is no clear definition of bacterial pneumonia (5).


Modality Sensitivity Specificity Area under the ROC
LUS 95.5% (93.6 – 97.1) 95.3% (91.1 – 98.3%) 0.98
CXR 86.8% (83.3 – 90.0) 98.2% (95.7 – 99.6)


KidSONO: Alveolar Consolidation (Pneumonia)


Author: Emma Burns 
Secondary Author: Kirstin Weerdenburg 
Reviewer(s): Melanie Willimann and Mark Bromley 

**To continue through to the course, make sure to select the “Mark as Completed” button below, and at the end of each lesson page that follows.


By selecting the “Mark as Complete” button below, I acknowledge that:

  • This activity is educational only.
  • Completion does not grant certification, credentialing, privileging, or independent authorization to perform point-of-care ultrasound.
  • I am responsible for practicing within my professional scope, training, local institutional policies, supervision requirements, and regulatory requirements.
  • I will not rely on point-of-care ultrasound findings in isolation when making clinical decisions.
  • Any clinical use of point-of-care ultrasound remains subject to local governance, quality assurance, documentation, and patient safety processes.

Indications

Indications

  • Chest pain
  • Dyspnea
  • Blunt & penetrating trauma
  • Unexplained hemodynamic instability


Equipment

  • Ultrasound machine
  • Phased Array (Cardiac) or Curvilinear (Abdominal) probe
  • Ultrasound gel

Note: The small footprint and low frequency of the phased array probe make it ideal to generate images of the heart through the intercostal windows.


Technique

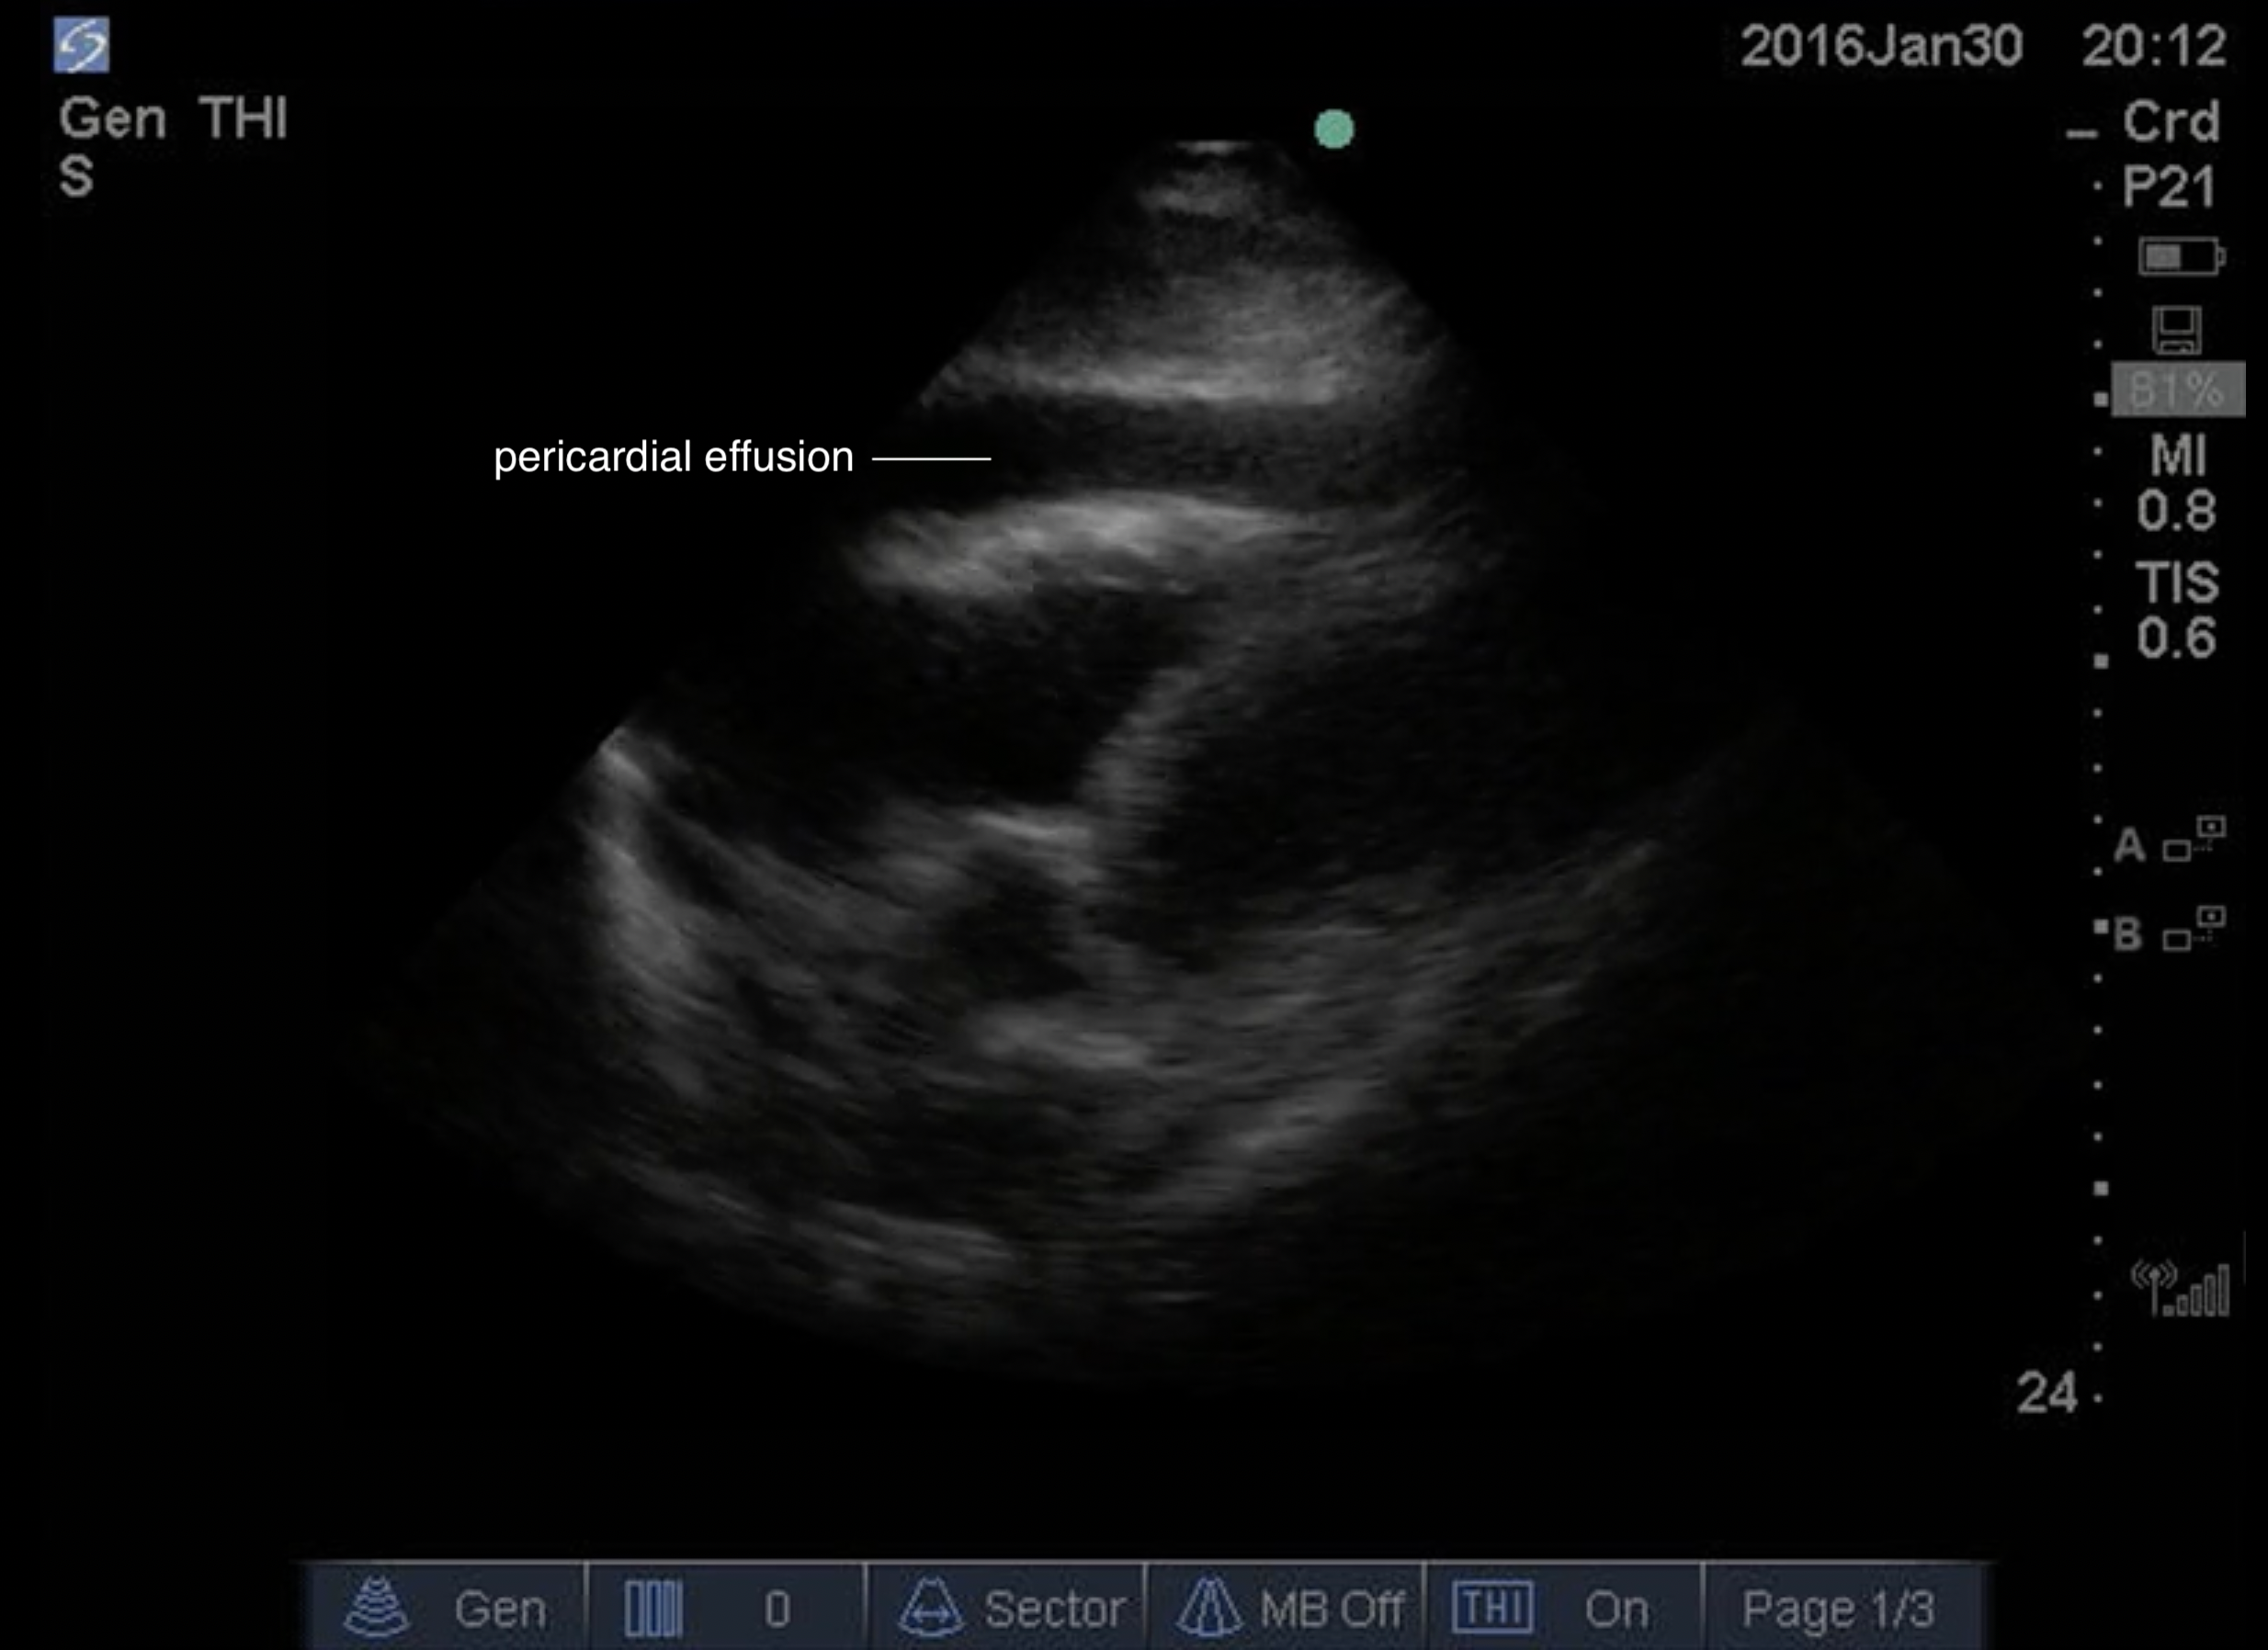
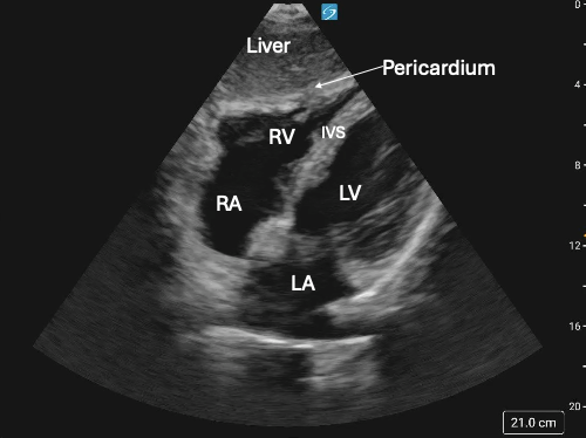
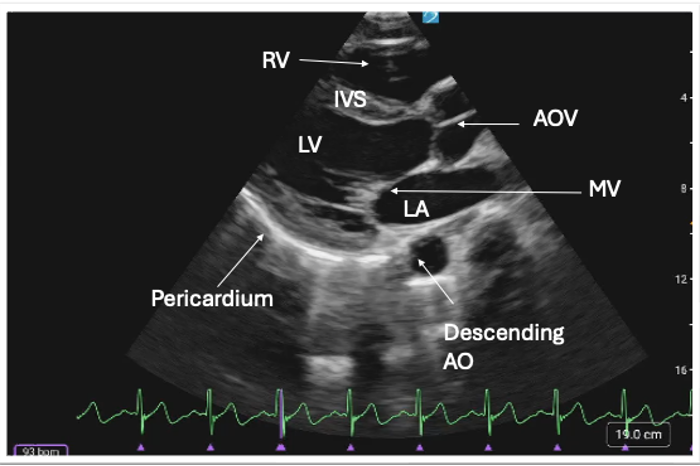
Pericardial effusions can be identified in all cardiac views, but we will focus on two with the highest yield: the subxiphoid view (also used in FAST scans) and the parasternal long axis view (PLAX). The other views (parasternal short view and apical four chamber view) have greater utility for other indications and will be reviewed in a separate module.


** For the purposes of this module, all views, probe orientation, and scanning instructions will follow the cardiology convention (screen indicator on the right). For guidance using the emergency medicine convention, please refer to the KidSONO Introduction to Cardiac Windows module**


Getting Started:

    • Place the ultrasound machine so it is easily viewed while scanning.
    • Ensure the patient is in the supine position.
    • Drape the patient to allow access to both the abdomen and anterior chest.
    • Set the ultrasound machine to an abdominal or cardiac setting, with the screen indicator on the left.
      • If assessing for pericardial effusion as part of a FAST/EFAST examination, the abdominal preset may sometimes be selected, in which case the screen indicator may appear on the left in the emergency medicine convention
    • You may use either the curvilinear or phased array probe.

Figure 1: Subxiphoid (A) and PLAX (B) views with the phased array probe/cardiac preset and screen indicator position highlighted. (C) Subxiphoid view with the curvilinear probe/abdominal preset with screen indicator highlighted


Subxiphoid View

1. Place the probe inferior to the xiphoid process.

2. Ensure the probe marker is directed towards the patient’s left.

3. The probe will typically be angled about 15 degrees upward from the surface of the abdomen.

· Place your hand on top of the probe to facilitate the shallow angle of this view.

4. Aim the probe towards the patient’s left shoulder.

5. Use the liver as your acoustic window (the liver will be seen in the near field).

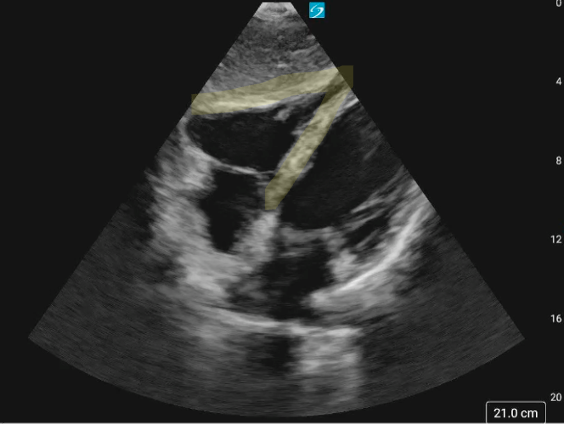
6. Identify the heart, including the posterior border of the heart, RV, septum and LV.

· These structures should make the shape of a ‘7’ on the screen.

7. Sweep SLOWLY through the heart from anterior to posterior.

· Identify any anechoic fluid collection in the pericardium.

FIGURE 2: Probe position subxiphoid view


Troubleshooting Steps

  • Ask patient to bend their knees to release tension on abdominal wall.
  • Continue to advance the probe superiorly until you reach the xyphoid process.
  • Use generous amounts of gel to minimize needing to “dig” under the xyphoid process.
  • Ask the patient to “take a deep breath and hold it” to bring the heart closer to the probe.
  • The image will improve as the probe moves closer to the heart.


Parasternal Long View

1. Identify the 3-4th intercostal space along the left sternal border.

2. Direct the probe marker towards the patient’s right shoulder.

3. Ensure the probe is directly perpendicular to the patient’s chest wall.

4. Identify the following:

· Near field: right ventricle

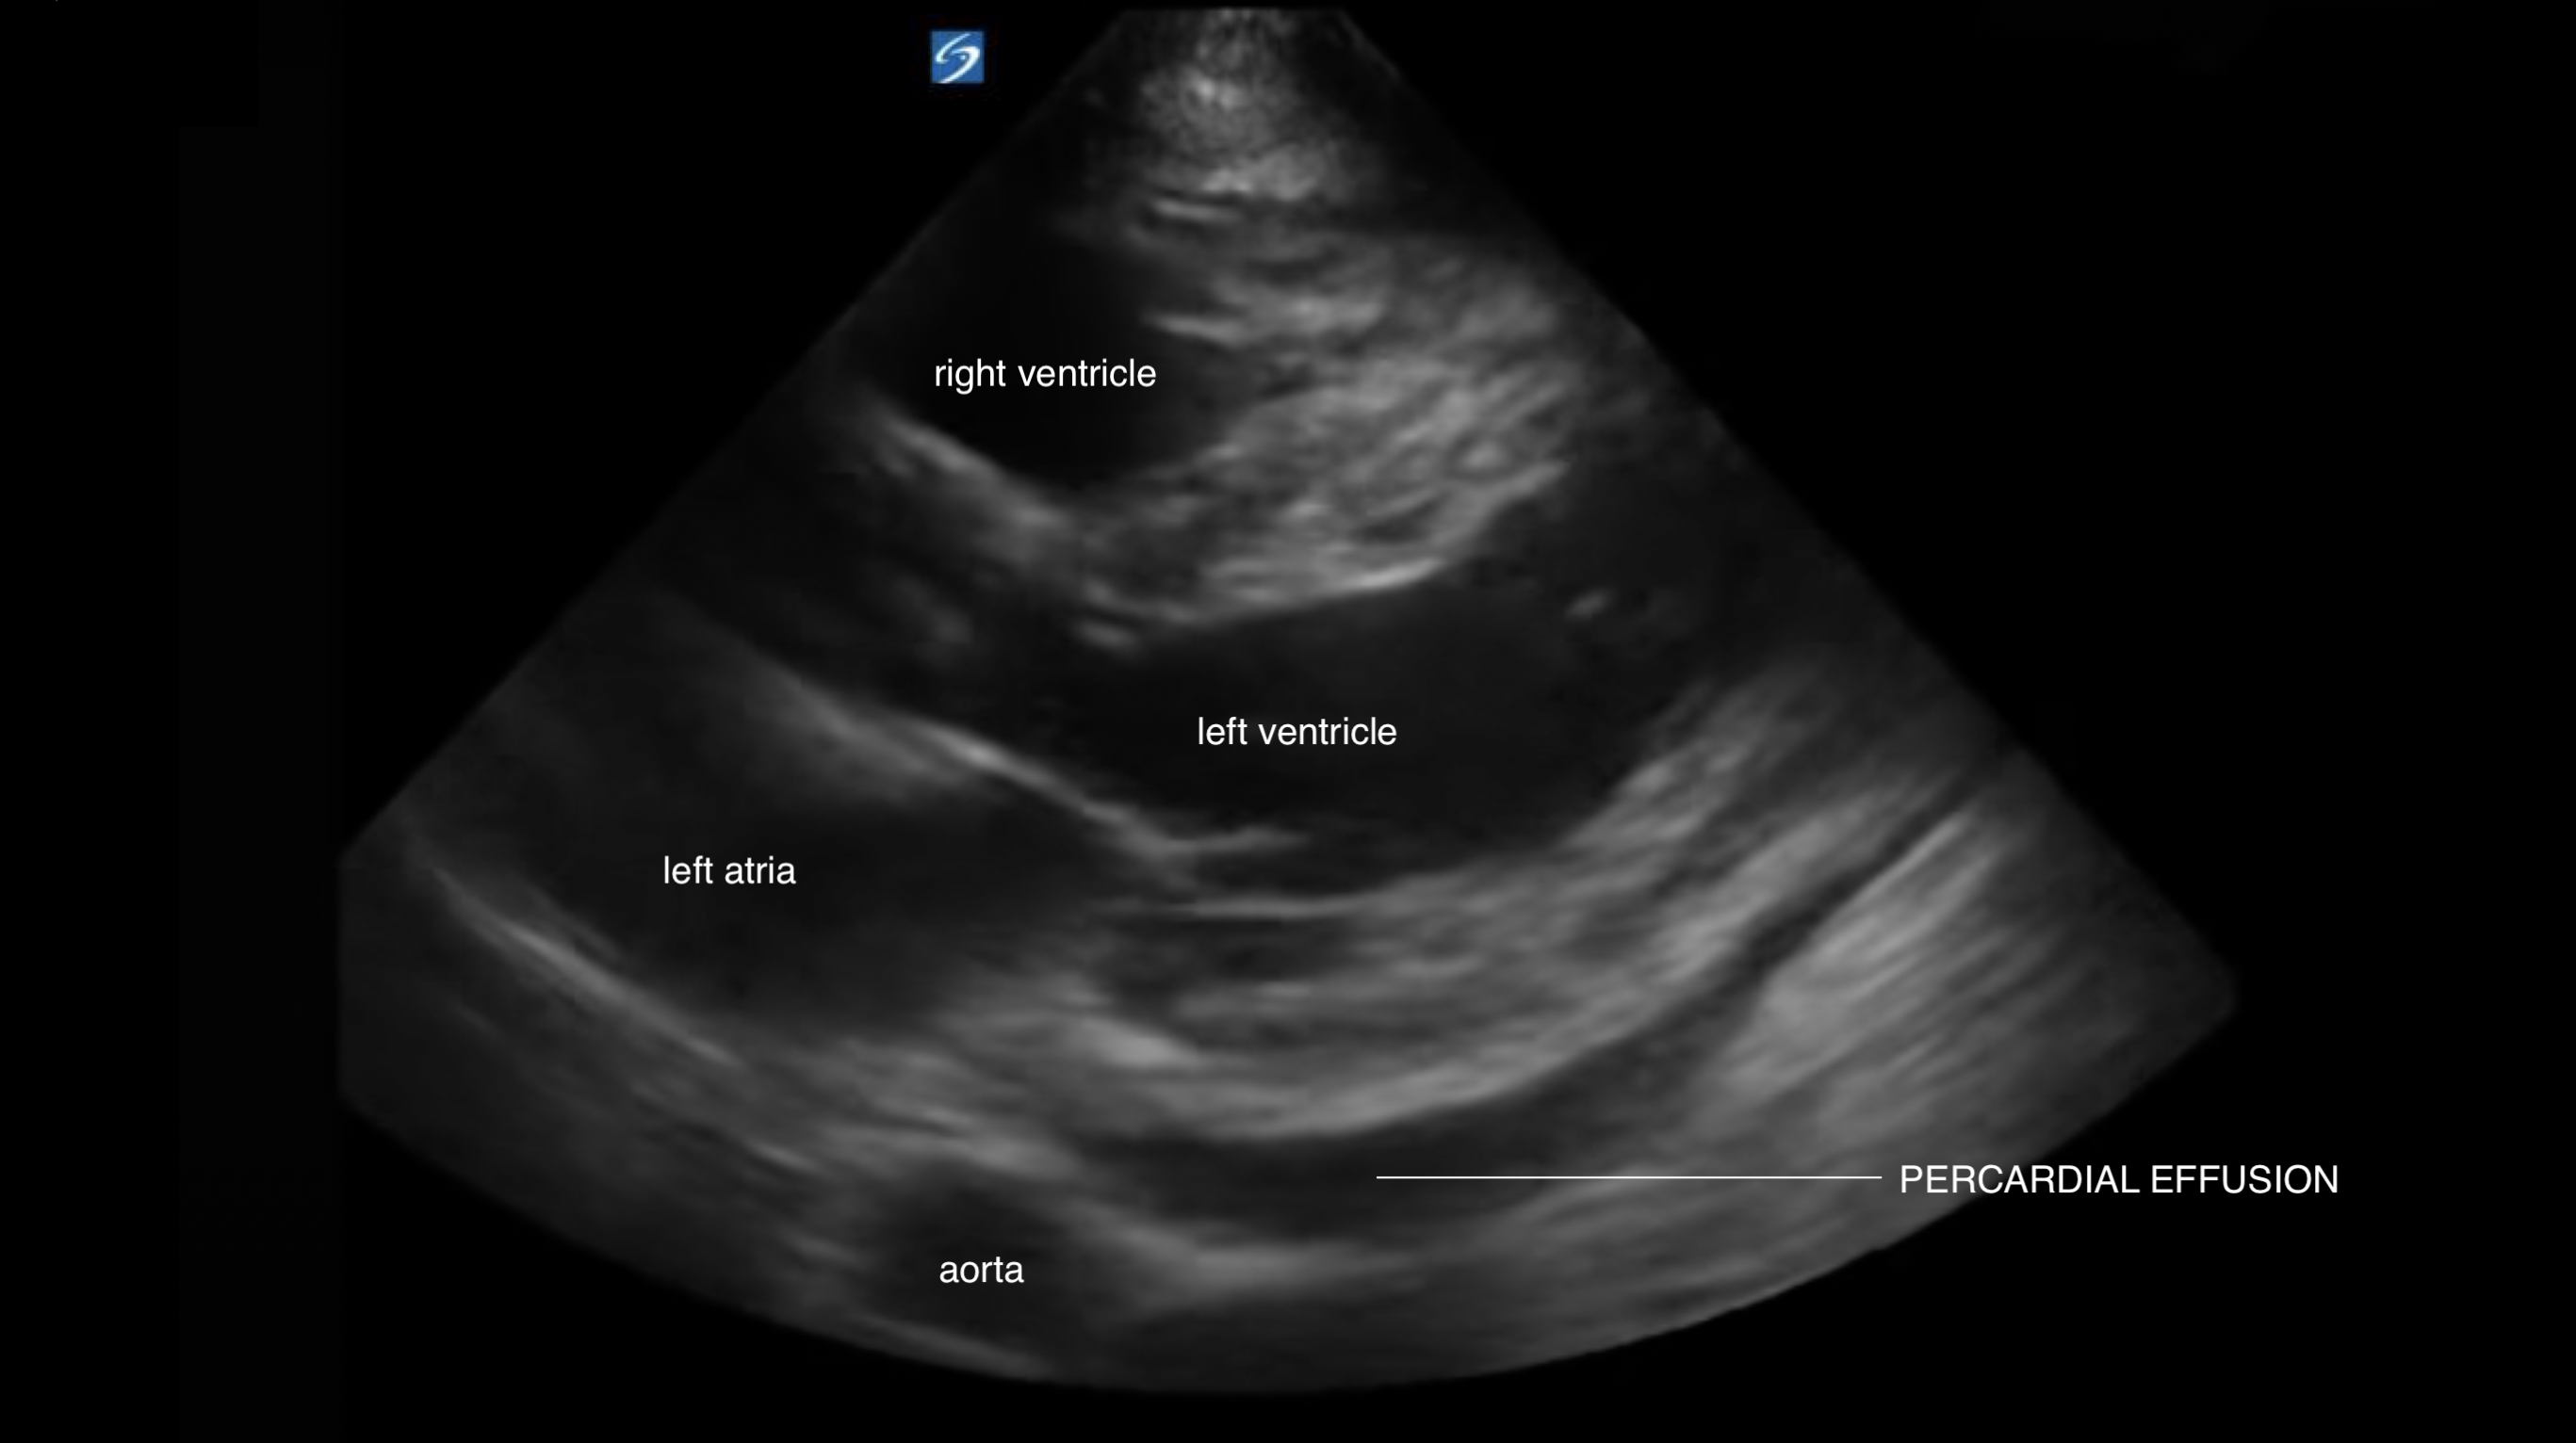
· Middle field: left ventricular outflow tract, left atrium, mitral valve, left ventricle

· Far field: descending aorta

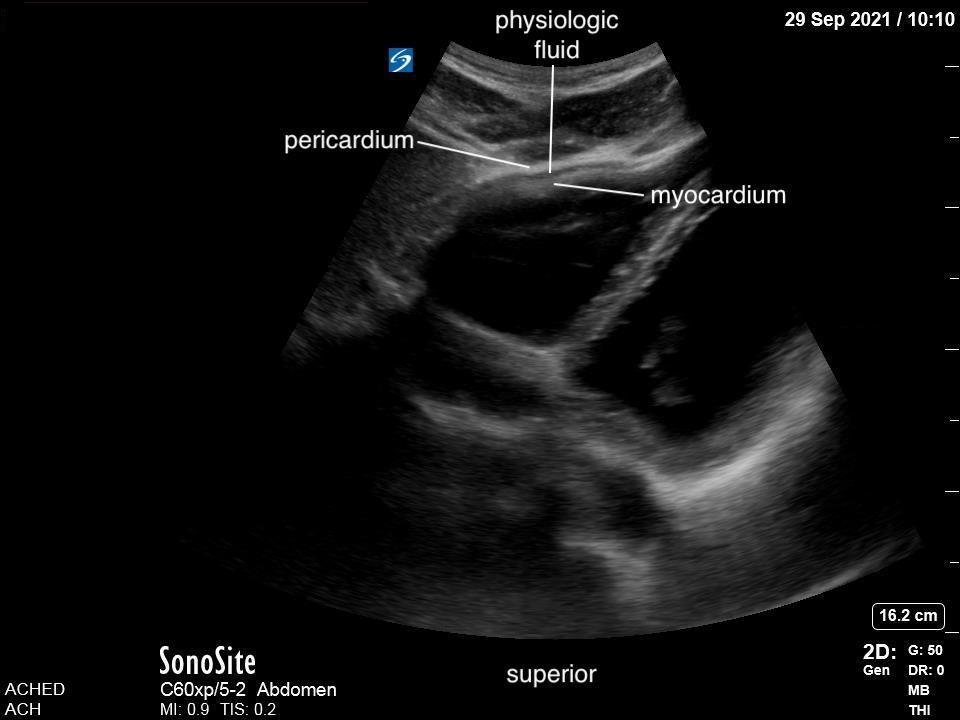
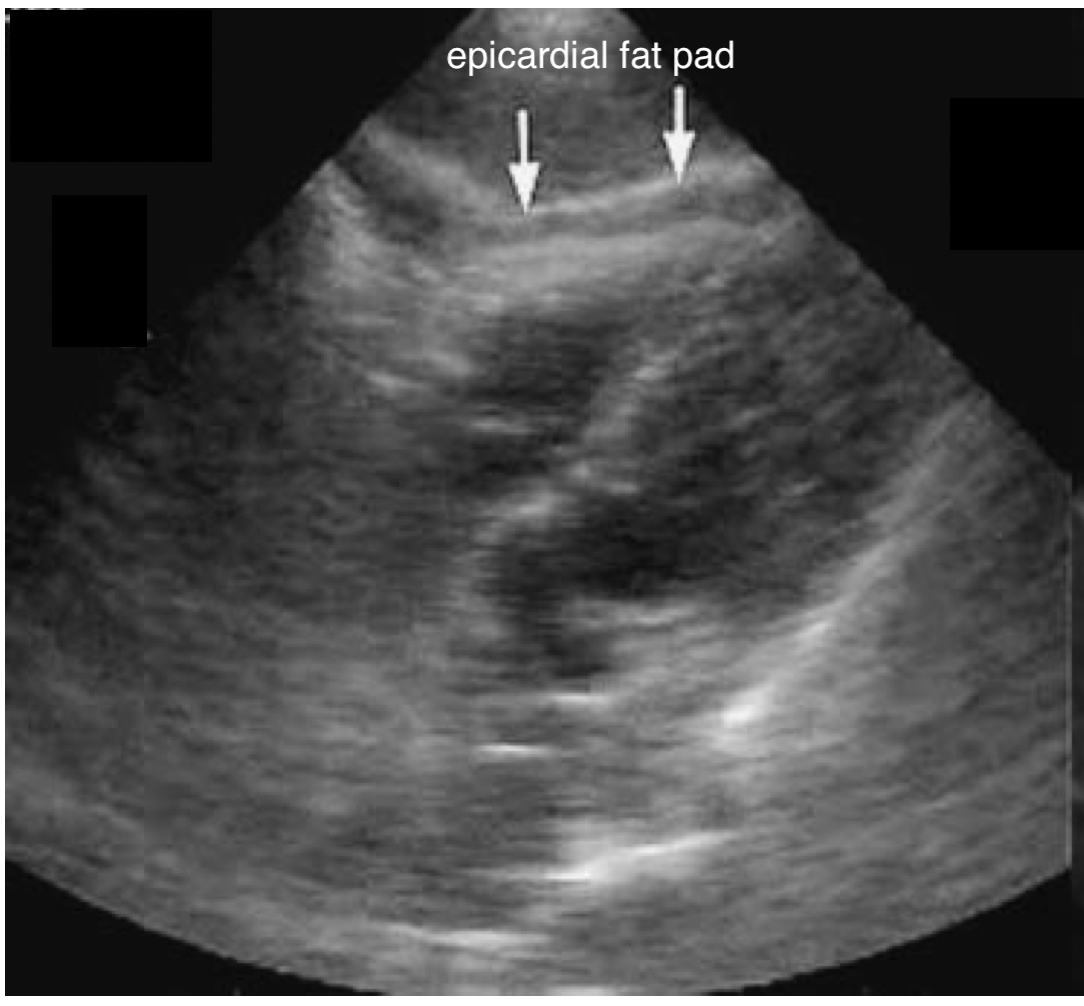
5. Assess for an anechoic fluid collection in the pericardium, deep to the myocardium of the LA and LV.


FIGURE 3: Probe position parasternal long view


Troubleshooting Steps: Lung Shadow

  • Ask the patient to breathe out completely and hold – helps to remove the lung shadow.
  • Rolling the patient into the left lateral decubitus position can also bring the heart closer to the chest wall and decrease the lung shadow.


Introduction

Introduction

The ability to use point of care ultrasound to detect pericardial effusions is an important skill for the acute care practitioner. In the trauma setting, the ability to rapidly identify a pericardial effusion as the cause of hemodynamic instability can focus early interventions and guide disposition decisions. Alternatively, in patients with non-traumatic chest pain or dyspnea, the ability to identify the presence or absence of a pericardial effusion can help to narrow the differential diagnosis.

POCUS allows physicians to make a rapid diagnosis of pericardial effusion in real time.


Why Ultrasound?

Currently, any urgent complete echocardiogram is done by cardiology. This can present logistical challenges; particularly after hours. POCUS is a simple and efficient way to identify a pericardial effusion, no matter the cause. It allows physicians to screen patients who would otherwise only be examined with poorly sensitive tools such as auscultation and chest radiography.

From a resource utilization perspective, this allows formal echocardiograms to be reserved for those with more complex medical needs, including congenital cardiac disease or high-risk clinical presentations. Ultrasound is low cost, portable and free of ionizing radiation. It is the diagnostic modality of choice for cardiac imaging given its ability to provide a real time look at the heart and its function [1]. Further, POCUS exams are easily repeatable and serial evaluation may be used as the patient’s status changes. This is an important consideration as the rate at which fluid may accumulate in the pericardium can vary [2]

Cardiac POCUS has been in use for many years in the emergency department. In 1988, Mayron et al found that 80% of emergency physicians felt comfortable diagnosing a pericardial effusion after only four hours of training [3]. Famously, a retrospective analysis of patients presenting to the emergency department with penetrating cardiac trauma had shown that the use of POCUS to identify pericardial effusion was associated with improved survival and time to diagnosis. In the study by Plummer et al., of 49 patients with pericardial effusions with equal predicted survival rates (according to TRISS methodology), 100% of those who had beside ultrasound survived, compared to only 57% of those who did not get bedside ultrasound [4]. In this study, it was felt that a main contributor to survival was the improved time to diagnosis. Specifically, POCUS allowed for time to diagnosis of 15.5 ± 11.4 minutes, whereas those without POCUS had an average time to diagnosis of 42.4 ± 21.7 minutes (p < 0.001) [4]. Further, many studies have looked at the sensitivity and specificity of emergency physicians in diagnosing pericardial effusions. These studies show a range of sensitivity from 83-100%, specificity of 98-99% and overall accuracy of 97.5-99% when compared to cardiologist readings [2,5,6]. Point of care ultrasound performs similarly in the hands of pediatric providers, with a sensitivity of 100% and a specificity of 99.5% for the detection of pericardial effusion in a pediatric emergency population [7].


Emergency Physician POCUS for Detection of Pericardial Effusion

  • Sensitivity Range 83-100%
  • Specificity Range 98-99%
  • Accuracy Range 97.5-99%


KidSONO: Pericardial Effusion


Author: Robyn Buna 
Secondary Author(s): Mark Bromley, Melanie Willimann  
Reviewer(s): Nicholas Packer 


**To continue through to the course, make sure to select the “Mark as Completed” button below, and at the end of each lesson page that follows.


By selecting the “Mark as Complete” button below, I acknowledge that:

  • This activity is educational only.
  • Completion does not grant certification, credentialing, privileging, or independent authorization to perform point-of-care ultrasound.
  • I am responsible for practicing within my professional scope, training, local institutional policies, supervision requirements, and regulatory requirements.
  • I will not rely on point-of-care ultrasound findings in isolation when making clinical decisions.
  • Any clinical use of point-of-care ultrasound remains subject to local governance, quality assurance, documentation, and patient safety processes.

Summary

Summary

Difficult IV access is a common issue faced in the pediatric patients and ultrasound guidance improves success and efficiency over the traditional land marking approaches. A dynamic approach is preferred, and the choice of out-of-plane vs in-plane technique is operator dependent. The ideal vessel for USG PIV placement is greater than 0.4cm in diameter, between 0.3 and 1.5cm in depth and at least 1cm in length. Long catheters are preferred to increase longevity.


Remember:

  1. Prepare: Gather your equipment
  2. Optimize: Position, tourniquet, warm compress, and local anesthetic
  3. Identify: Select a target vessel. Confirm it is venous looking at wall thickness and compressibility
  4. Poke: Introduce the needle and follow the tip through its course from the skin into the vessel
  5. Confirm: Confirm catheter placement and secure it to the patient


Pitfalls

Pitfalls:

Immediate: unsuccessful attempts are most commonly due to puncturing the posterior wall and failing to visualize the needle tip as it enters the vessel. If care is not taken accidental injury to surrounding structures or inadvertent arterial cannulation is possible.

Late: Dislodgement is the most common cause of USG PIV failure as is often due to the placement of a short catheter in a deeper vein. It is recommended that A MINIMUM of 1 cm of catheter is left within the vessel after placement to prevent dislodgement by movement of the skin and soft tissues and ideally at least half of the catheter length is intraluminal. Given deeper vessels are often targeted in the US-guided technique compared to the landmark technique it is often beneficial to choose a longer catheter for placement.